Tunisian Crochet seams can often look botched and ugly.
Here’s how to make your Tunisian Crochet garments and accessories look seamless!
Start With Some Tunisian Crochet
In this case, I have made a lovely piece of Tunisian Simple Stitch which I’m going to seam along the first and last rows.
Keep the last row you made closest to you, with the Right Side facing outwards.
Setting Up the Seam
The first thing we’re going to do, is add a little slip stitch to the two corners of our seam. This will ensure the edge of our work is smooth.
Find the V on the edge of your FIRST row and add a slip stitch to it.
2. Insert finger between sides to help control your work.
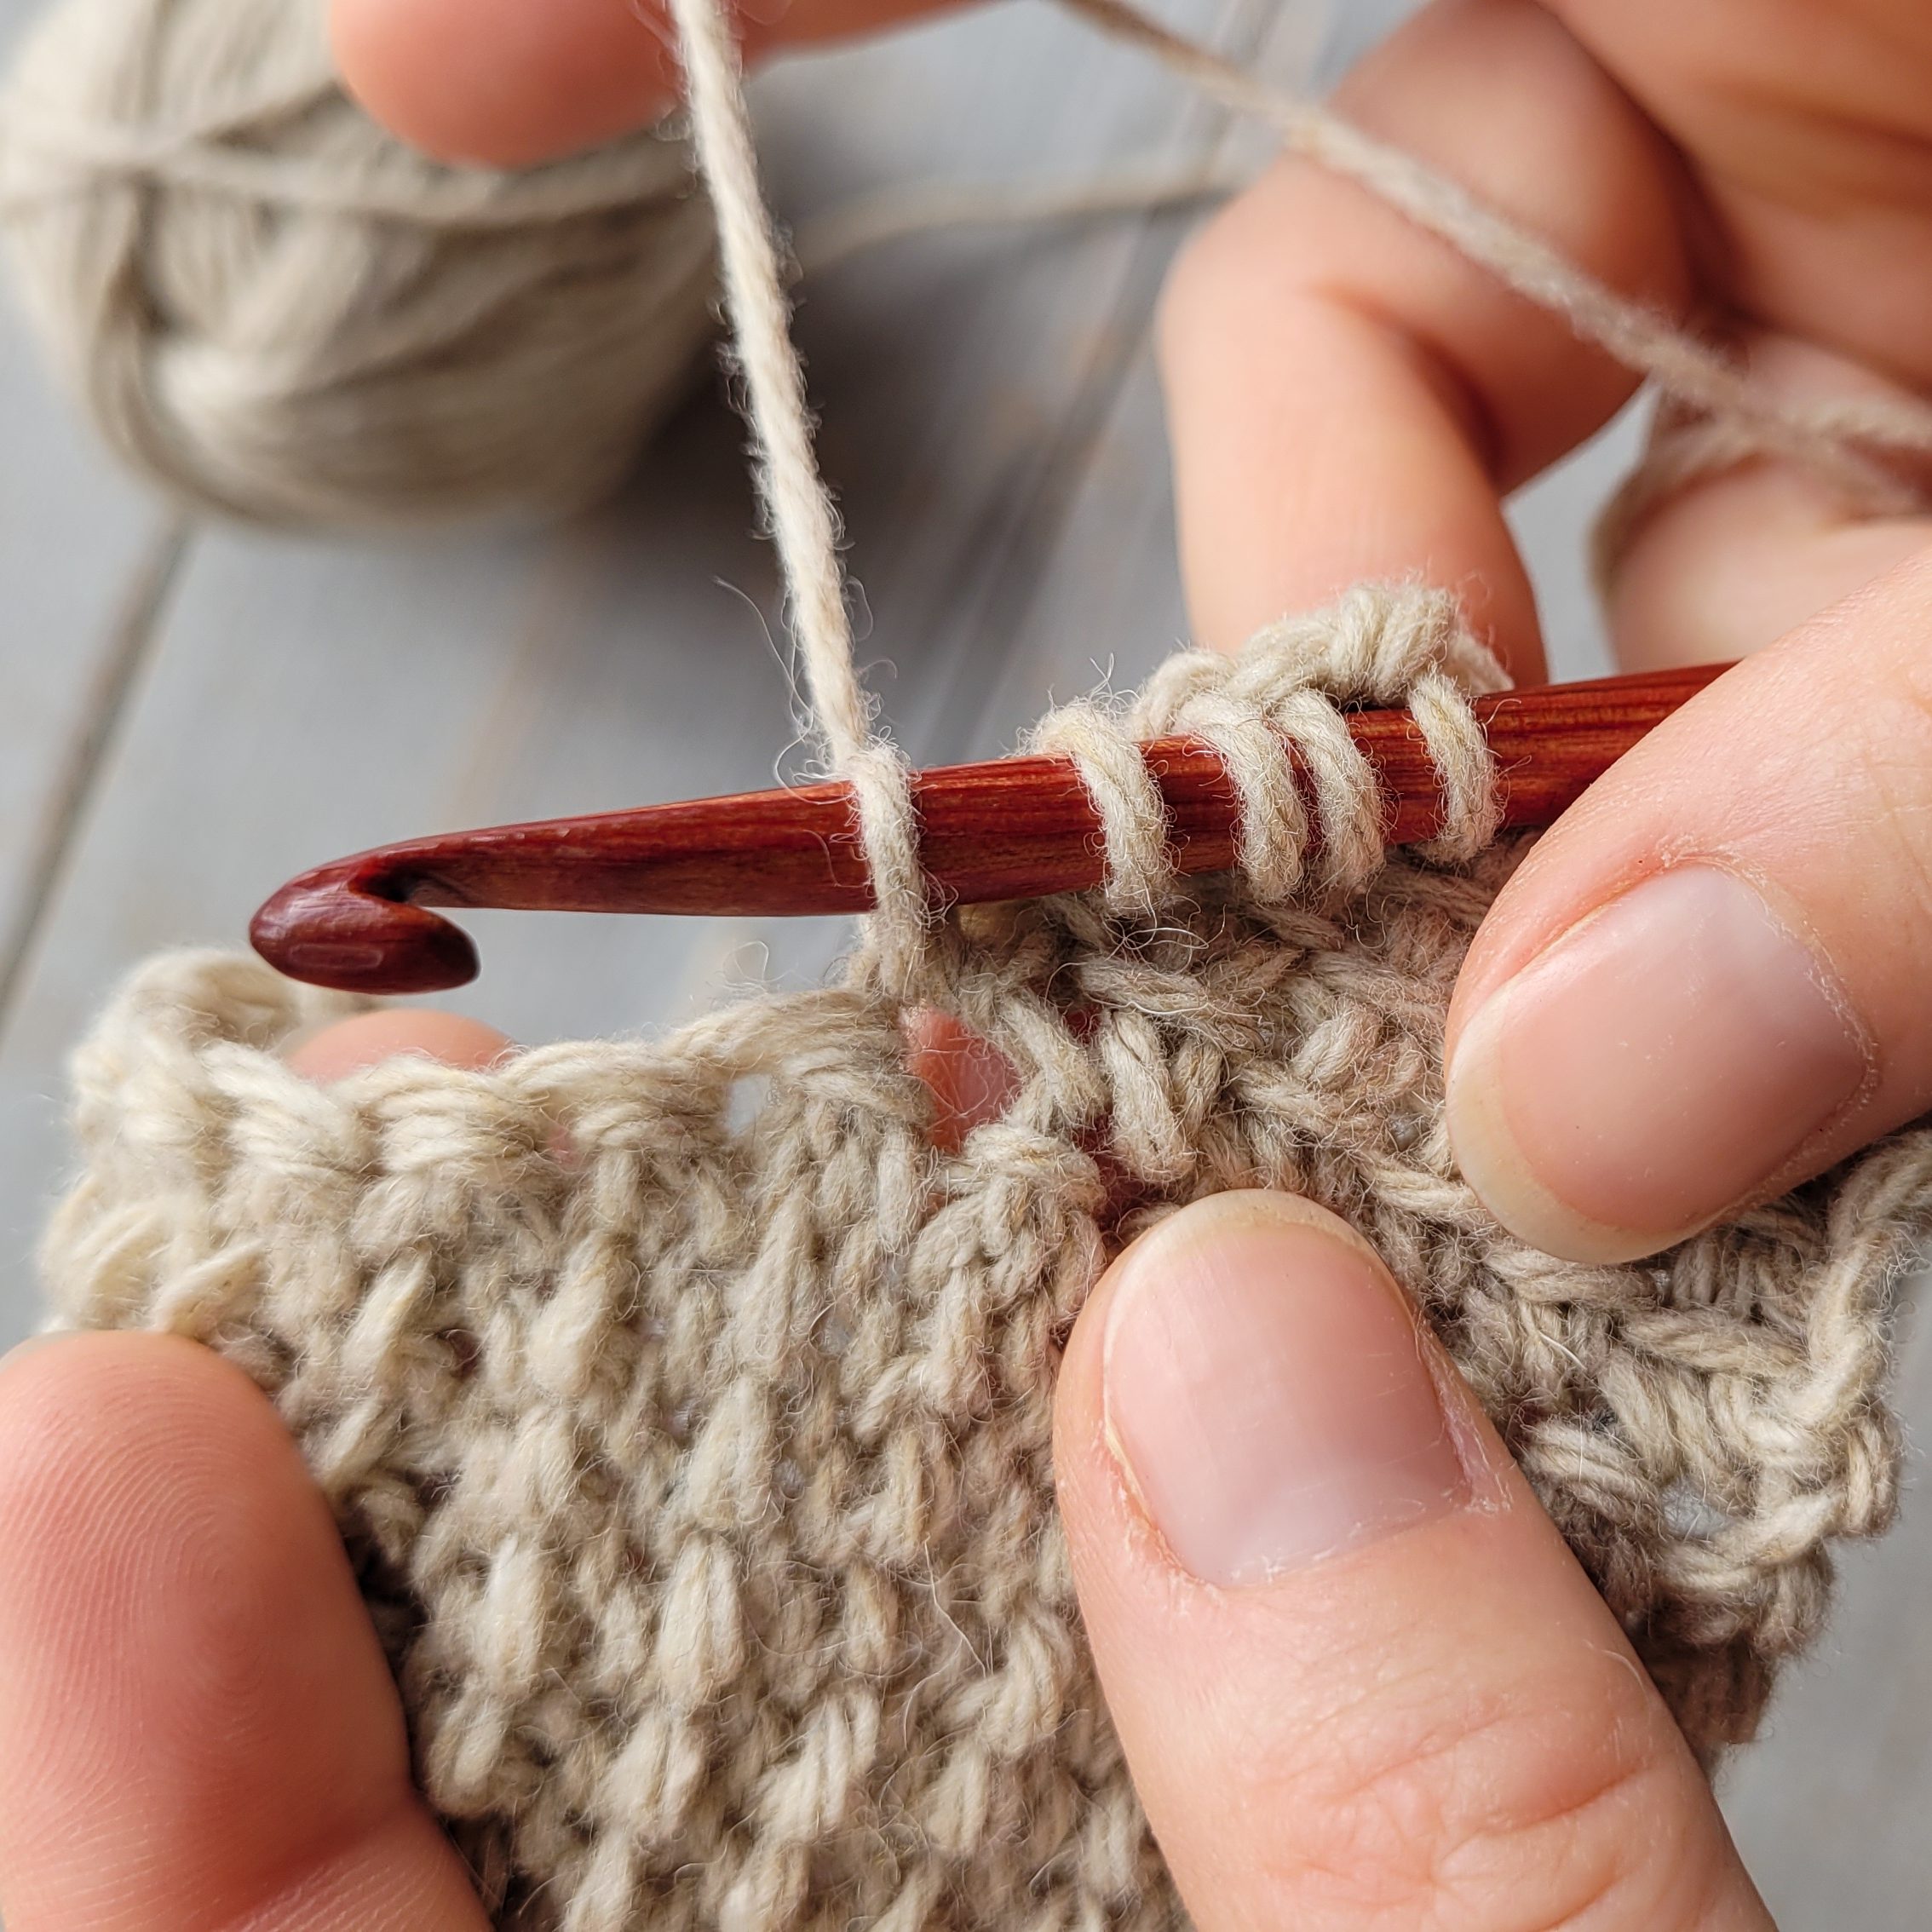
Now, we can get to the real seaming business:
This seam is made by “zipping” one side of your fabric to the other. We will be pulling each bar/line on the LAST row through each bar/line on the First row, and securing it there with a UK dc / US sc.
Here’s how:
Locate the nearest line/bar on the FIRST row
2. Insert hook into it
3. Locate the nearest line/bar on the LAST row
4. Insert hook into it
5. Secure LAST row loop with hook and…
6. Draw LAST row loop through FIRST row loop
First ‘zip’ complete
Time for a little traditional crochet!
* This seam won’t hold without a little help, so we’re going to add a UK dc / US sc st onto the loop left on the hook. Let’s do it!
1. Yarn Over.
2. Draw Yarn Over through one loop
3. Yarn Over again.
4. Draw Yarn Over through both loops
Repeat the “zip and secure” sequence for each pair of bars/lines on your seam until you get to the end.
It will look like this at this stage.
The inside of a completed (Almost) Invisible Seam.
There’s just one final thing to do; slip stitch into the two corners to smooth out the edge.
Here’s how:
1. Insert hook into both corners.
2. Yarn Over.
3. Draw Yarn Over through everything else on hook.
Bind off. Weave in ends. You know the drill.
Then, when you flip your fabric the right way out, you notice your seam is (almost) invisible, nice and strong and flexible!
A completed (Almost) Invisible Seam
SIDE NOTE: You may ask, “Hey, Aoibhe, why not use a slip stitch throughout the seam? Surely that’d take less time, use less yarn and sit flush with the fabric, right?”
And I’d say, yes, it would. Technically.
But also, slip stitches have zero stretch and zero chill.
Tunisian fabric has a lovely level of 4-way stretch, and if you add a non-stretchy seam to one part, it’s bound to cause shaping, comfort and blocking issues.
So, while a double crochet is, indeed, a little bigger, uses a little more yarn and takes more time to do, it’s still a better choice over all.
Tunisian Crochet seams can often look botched and ugly.
Here’s how to make your Tunisian Crochet garments and accessories look seamless!
Start With Some Tunisian Crochet
In this case, I have made a lovely piece of Tunisian Simple Stitch which I’m going to seam along the first and last rows.
Right Side in, Wrong Side out. Last Row furthest away from you.
Setting Up the Seam
The first thing we’re going to do, is add a little slip stitch to the two corners of our seam. This will ensure the edge of our work is smooth.
Find the V on the edge of your FIRST row.
2. Insert hook, from front to back, into it.
3. Yarn Over
4. Draw the Yarn Over through work and through loop on hook.
Now, we can get to the real seaming business:
This seam is made by “zipping” one side of your fabric to the other. We will be pulling each bar/line on the LAST row through each bar/line on the First row, and securing it there with a UK dc / US sc.
Here’s how:
Locate the nearest line/bar on the FIRST row
2. Insert hook into it
3. Locate the nearest line/bar on the LAST row
4. Insert hook into it
5. In order, from left to right: LAST row loop, FIRST row loop, loop that was already on the hook.
6. Draw LAST row loop through FIRST row loop
First ‘zip’ complete
Time for a little traditional crochet!
* This seam won’t hold without a little help, so we’re going to add a UK dc / US sc st onto the loop left on the hook. Let’s do it!
1. Yarn Over.
2. Draw Yarn Over through one loop
3. Yarn Over again.
4. Draw Yarn Over through both loops
Repeat the “zip and secure” sequence for each pair of bars/lines on your seam until you get to the end.
It will look like this at this stage.
A completed (Almost) Invisible Seam
There’s just one final thing to do; slip stitch into the two corners to smooth out the edge.
Here’s how:
1. Insert hook into both corners.
2. Yarn Over.
3. Draw Yarn Over through everything else on hook.
Bind off. Weave in ends. You know the drill.
Then, when you flip your fabric the right way out, you notice your seam is (almost) invisible, nice and strong and flexible!
A completed (Almost) Invisible Seam
SIDE NOTE: You may ask, “Hey, Aoibhe, why not use a slip stitch throughout the seam? Surely that’d take less time, use less yarn and sit flush with the fabric, right?”
And I’d say, yes, it would. But also, slip stitches have zero stretch and zero chill.
Tunisian fabric has a lovely level of 4-way stretch, and if you add a non-stretchy seam to one part, it’s bound to cause shaping, comfort and blocking issues.
So, while a double crochet is, indeed, a little bigger, uses a little more yarn and takes more time to do, it’s still a better choice over all.
How to increase the height of your Tunisian Crochet column, without leaving a hole in your fabric.
This is so quick to do. You’ll love it.
Start With Some Tunisian Crochet
In this case, I have a layer of crochet done, and have started into a second layer. The layer I’m working on is three bars high.
If you want to do the same, go ahead, I can wait. It’s no bother. I can just go make a cup of tea.
A layer of linked stitches.
Work the Downward Pass
Pick up loops in all the bars, as you have done for every column of the row so far. Don’t work into the next base just yet. We’ll get to that in a second.
Do you see the hole at the base of your PREVIOUS column? Work your hook into it.
Loops picked up. Hole at base of previous column visible to the left of thumb.
2. Hook into hole at base of previous column.
Yarn Over, and draw a loop through fabric.
This adds a loop to hook that wouldn’t have been there otherwise (an increase)
Yarn Over
2. Extra Loop
Now, we continue the Downward Pass by working hook into NEXT base:
Hook worked into NEXT base along.
Yarn Over, and draw a loop through to front of fabric:
Yarn Over
2. Pull through
Work Tunisian Crochet Upward Pass as usual
* Yarn Over, pull through two loops * repeatedly until one loop is left on hook.
The three bars are now accompanied by a fourth (at the bottom of the column).
You are now working with four bars where before, you only had three.
Here’s what a completed, taller layer will look like.
A three-bar layer has been transformed into a four-bar layer. Lovely job!
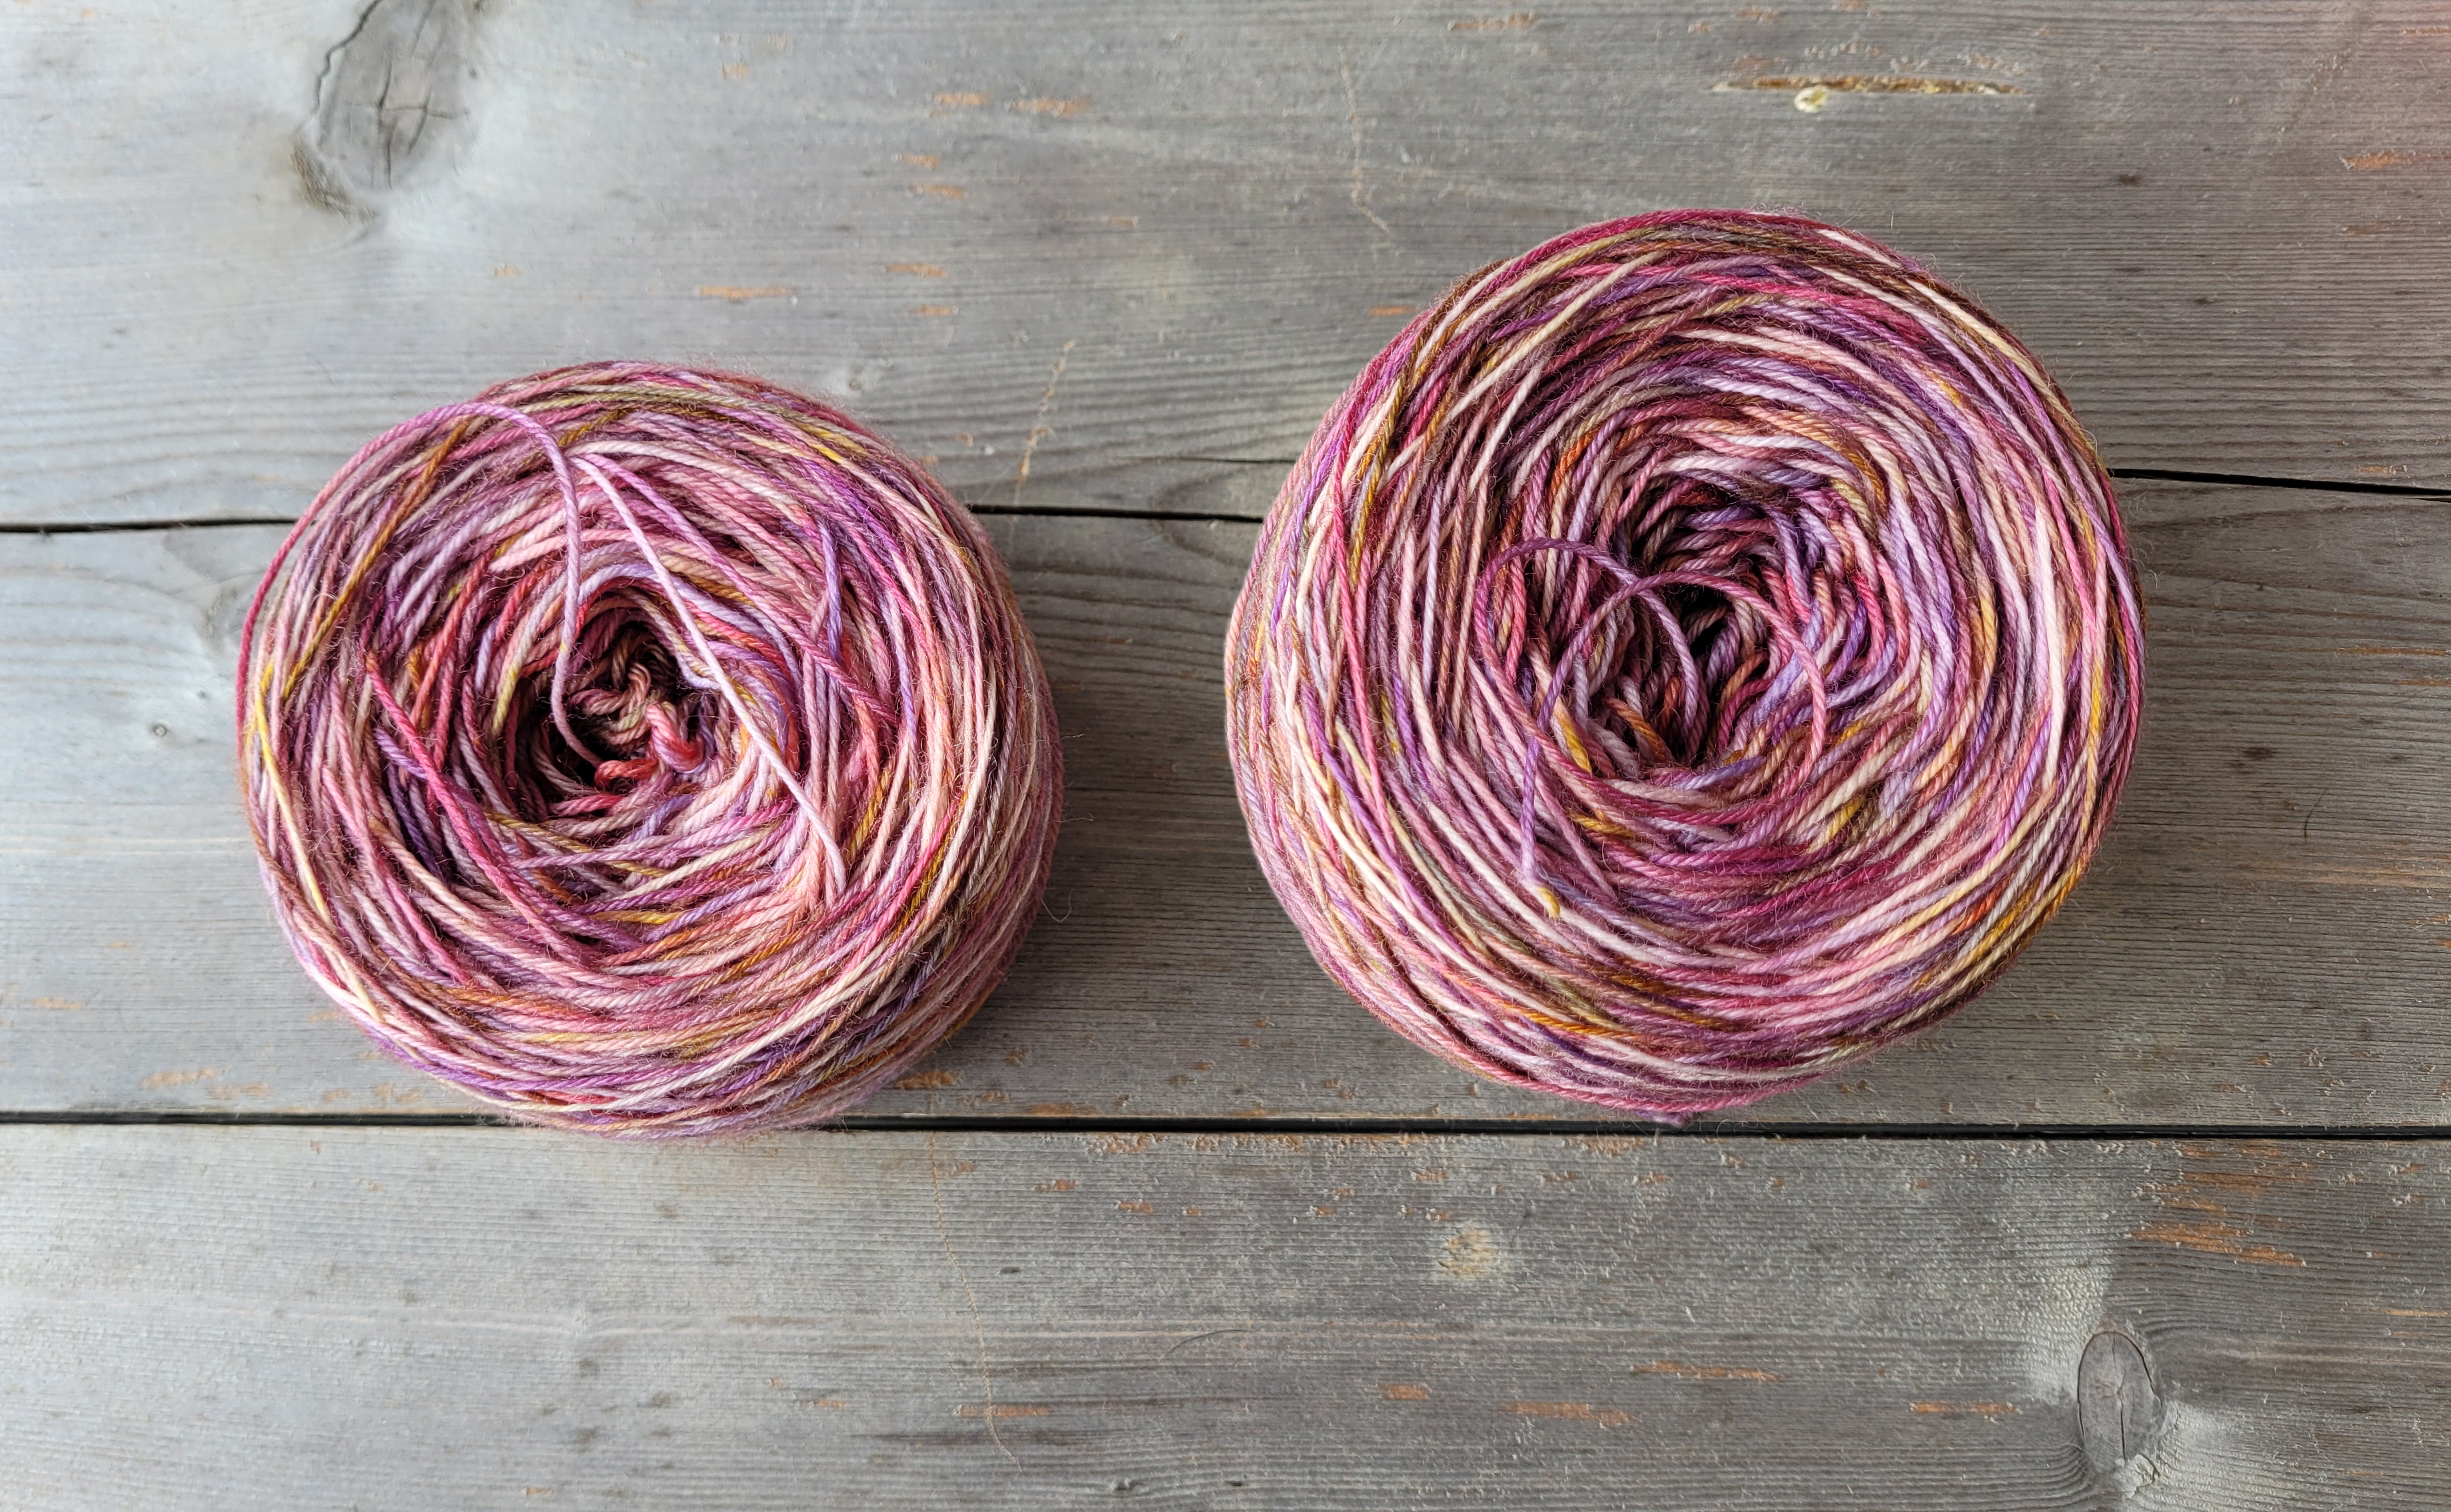
Have you ever considered the tension your yarn is under once it’s been wound into a cake or ball? One of the main reasons yarn is sold in a skein is to preserve its elasticity. So, from the second you wind it, it’s being held at a stretch.
Animal fibres in particular have a gorgeous spring to them. If you stretch them, they snap back on release. This elasticity gives a finished garment a bounce and a wearability that is a pleasure to behold.
But if these fibres are held at their limit for too long, they can lose that elasticity entirely. That’s why you should only wind your skeins when you intend to knit or crochet with them soon after. It’s also why those old balls of donated yarn tend to seem so lifeless – they’ve been held at a stretch for decades. Yikes.
Ball winders and swifts are an amazing piece of kit I believe every crafter should invest in, but there’s a pull between swift and winder, so even they can add tension to a newly-wound skein.
They’re actually the exact same skein. The one on the left has been wound directly from the skein on my swift. The one of the right is the same ball, wound from the first cake into a second, much more relaxed cake.
Look at the size difference! And imagine the tension the first one would have been under had I only wound it once.
Same exact skein of yarn, first wind (left) second wind (right)
So, tell me. Are you kind to your yarn? Do you ever rewind?
And if you haven’t done it before now, have I convinced you to start? I sure hope so! And I bet your yarn will thank you, too!
Oh! And… psst! The yarn I’ve pictured here is a beautiful skein of Ballyhoura Fibre yarn. It’s Cierra’s 4-ply sock in colourway “Pot Pourri”. Watch out for it in a pattern this autumn! You can find the link here: https://www.ballyhourafibres.com/
Tunisian Crochet has texture for daaays. It’s one of the things I love the most about it. From that gorgeous stripe on Simple Stitch, to the squishy bounce of Knit Stitch, you can’t go wrong with a little TC. But sometimes, you wanna turn the volume up on that texture. That’s where Tunisian Crochet Relief stitches come in.
You can use it to add ribbing and cables to your crochet or a simple POP! to the edge of your fabric.
Starting off. A small piece of Tunisian Simple Stitch fabric.
Let’s Get Set Up
Below you’ll see I’ve worked the first 5 TSS on the next row, and added 1 Yarn Over to my hook. That gives me 7 loops on the hook in total.
Yarn Over on hook
Next, make a TSS3tog decrease.
To make a TSS3tog, slide hook into the next 3 lines, Yarn Over, and draw loop back through all three lines.
Hook in…
Yarn Over and draw through
Once you have that done, add another Yarn Over to the hook, and complete the row as usual.
Yarn Over…
Work TSS sts for the rest of the row
At the end of the Forward Pass, we use the same rule as always for the Return Pass. That rule? Yarn Over and draw through one loop, then *Yarn Over and draw through two loops* repeatedly until you are back to one loop on the hook. (Psst! Treat each loop the same, whether it’s a Yarn Over, or a legit stitch.)
That’s the “Foundation Row” complete
And, this is what your row will look like after all those “YOs and pull throughs” are complete.
Two eyelets with a TSS3tog decrease in the middle
As you can see above, our decrease is now flanked by two lace eyelets made by those lovely Yarn Overs we added. Those eyelets will be used to anchor the beginning of our relief work.
One Last Thing, before we get to the Crochet Relief Stitches
Complete one more row of regular Tunisian like this:
Work TSS sts up to the first eyelet. Then press hook from front to back into eyelet.
5 TSS sts on the hook (Making 6 loops in total)
Hook through first eyelet
Yarn Over Hook, and draw the Yarn Over back to the front of the fabric.
Yarn Over…
Draw through eyelet to the front again
Press hook into next stitch (This will be the stitch coming out of the previous row’s TSS3tog) Yarn Over Hook, and draw the Yarn Over through stitch.
Hook in…
Yarn Over and draw through
Find the second eyelet, and press hook through it to the back of the fabric.
Identifying the eyelet
Hook in second eyelet
Yarn Over and draw the Yarn Over through eyelet to the front again.
Yarn Over…
…and draw through
Complete the Forward Pass of the row as usual…
And then work the Return Pass to complete the row.
Ready to make your first Tunisian Crochet Relief Stitch!
Everything is all set up, so we can now get to our Tunisian Crochet Relief Stitches! First thing we need to do is work the first 6 TSS sts. This will bring our hook up to (but not into!) the st directly over the TSS3tog.
Then, Yarn Over on your hook TWICE.
6 TSS sts made (Giving you 7 loops on your hook)
Yarn Over TWICE
Push hook through first eyelet to the back of the fabric… Then weave it back to the front of the fabric through the second eyelet.
In one…
and out the other
Yarn Over, and draw that newest Yarn Over back along the path your hook hook. i.e through the second eyelet to the back of your fabric, then forward to the front of your fabric through the first eyelet.
Yarn Over…
…and draw through
To complete your first Relief Stitch work the following: *YO, draw through two loops* twice.
First Relief Stitch complete
If you’d like to see your relief stitch a little clearer, fold the fabric in front of your hook back. Your Relief Stitch will stand out better.
A better view of the completed Relief Stitch
Complete the rest of the Forward Pass as usual, starting with the stitch directly above the second eyelet. (There is a stitch behind the Relief Stitch that should remain unsued)
These two photos below are what it looks like once you have the Forward Pass of the row complete.
Relief Stitch in place
Thumbs highlighting the Relief Stitch
When your Return Pass is all done and dusted, this is what it will look like. As you can see in the second photo below, a nice big gap exists betwen the relief stitch and the body of the fabric. That gap will be used to attach the next row’s Relief Stitch to the first one.
Return Pass complete
Check for the gap before continuing.
Pro Tip. If you have difficulty controlling the gap, pop a lockable stitch marker in there.
Second Relief Stitch
Start your second Relief Stitch by adding one Yarn Over to your hook. Then press your hook into and through the gap we just checked out.
Yarn Over
Through the gap
Yarn Over, and draw the Yarn Over back through the gap.
Yarn Over…
Back through the gap
Yarn Over, and draw through two loops.
Yarn Over, draw through two loops complete
And this is what the row looks like with the Return Pass complete
Work the Return Pass as per usual, folks.
On every relief row after this, work the same instructions you used for the second relief row. After a few rows, it’ll start to look like this little piece of gorgeousness below.
Several Relief Stitch rows complete
Final Thoughts
Now, some of you may be asking “But, Aoibhe! Why did you use TWO Yarn Overs on the first one, and only ONE thereafter?”
And I’d answer that by complimenting your eagle eyes, and by telling you that for the first relief stitch, we had two rows to work over, so it needed to be a bit longer.
The rest of the relief stitches will only have one row to work over, so they get to be a little shorter.
Additionally, if I worked all the relief stitches with two Yarn Overs, they’d be saggy and loose, and would catch on ev-ery-thing when you wore it.
So, there you go! Well done!
Video Demonstration of a Tunisian Crochet Relief Stitch
Ah, Pax. Pax, my beloved Tunisian crochet shawlette.
This is my most popular pattern (as much because I’ve priced it to be accessible to anyone wanting to learn Tunisian lace crochet, as because I kept it complication-free purely to keep the pattern simpler for beginners).
Occasionally, I get questions about it, though, and the majority of them are to do with starting out. Usually, I reply to beginner crocheters’ questions individually, but I thought “How great would it be if I updated Pax with a new photo tutorial?” It is 11 years old at this stage, and could do with sprucing up… so…
If you’ve got a copy of Pax, a crochet hook at the ready, and you’re not sure how to begin, let me help you out.
Today's Yarn, by the way, is Drops Flora.

It's a wool/alpaca blend that I'm currently obsessed with. It's warm, has great stitch definition and a wide range of colourways.

And my hook, as always is a beechwood KnitPro Symfonie - this one's my trusty 5 mm.
Make Some Chains
OK, so the pattern calls for way more chain stitches than this. I’ve made 20 chains here to demonstrate the technique, but you will be making way more when you start your own Pax adventure.
First things first, we need to take a look at our chains. We’re going to skip the chain closest to the hook, and work instead into the second chain along.
Find the second chain…
Push hook through top loop of chain
Hook is now completely through loop on second chain
Yarn Over on your hook, and draw that Yarn Over back through the chain. This will give you two loops on your hook –
The loop furthest from the hook head was there already.
The loop closest to the hook head is your first Tunisian Simple Stitch.
Yarn over
Draw through chain
The Forward Pass
We then do the same for the next chain along.
Important Note for Beginners: We ONLY skip the very first chain in Tunisian crochet. No other chains are skipped from this point on.
Find the next chain along
Push hook through
Yarn over…
Draw Yarn Over through chain
Every time we repeat this process, we add a loop to the hook. When we have added ten stitches, we’ll have eleven loops in total (that includes the one that was there from the beginning)
11 loops = 10 stitches
For this tutorial, this completes our “Forward Pass”.
In Tunisian Crochet, we have two “Passes” per row of work. The “Forward Pass” that we have just completed sees loops being added to the hook. The “Return Pass” will see us remove stitches as we work until we are back to one loop on the hook.
Between the Forward and Return Passes in Pax we have an extra dance step to do, and it involves the next chain along on our string of chains.
Working the “Base”
I want you to identify the next chain along, work your hook into it, Yarn Over, and draw a final loop onto your hook. A note on this loop: It is created the exact same way as all the loops before it, but its job is very different. It’s not counted as a stitch because it is, in fact, the base of the column. This will become clear as we work on.
There are now 12 loops on the hook That’s 1 at the start, 10 Tunisian Simple Stitches, and 1 base loop
The Return Pass
The Return Pass is easily my favourite bit of this whole process. It require far less concentration and is oddly satisfying.
All you have to do to complete the entire Return Pass is to *Yarn Over on your hook, and draw it through two loops* repeatedly, until you are left with one loop on your hook.
Yarn Over
Drawing through two loops
After the second repeat you start to see the row/colum forming in your hook’s wake
When you’re at that point, you’ve completed your row/column!
Foundation Row/Column complete
As you can make out in the above photo, the row/column we have completed has ten little rung or lines evenly spaced down its length. In the above photo they are vertical, look like little fence posts, and start at my right thumb nail and travel down the fabric to my left thumb nail.
We’re going to use these lines to anchor our second row/column.
Processing…
Success! You're on the list.
Whoops! There was an error and we couldn't process your subscription. Please reload the page and try again.
Row/Column 2
Slide hook through the first of these lines, like a bolt locking a door. We stay on the Right Side of the work for this. There’s no neeed to push through to the Wrong Side at all from hereon in.
Original loop on hook (right) and vertical line (left)
Then, same as before, we simply Yarn Over, and draw the yarn over through the line, giving us two loops on the hook.
Yarn Over
Draw through
Then, we find the next line along, and slide the hook through that.
Next line along
And we do the same thing – Yarn Over, pull through.
Yarn Over
Draw through – 3 loops on hook
Now, it’s just a matter of carrying on down, picking up loops using each of the available lines.
Ten loops added to hook for a total of eleven loops
With the Forward Pass complete, we work The Base into the next chain along:
Hook in next chain along…
Yarn Over
Draw through – 1 more loop added to hook There are 12 in total now
With that taken care of, we get to do the Return Pass for the row/column. That’s *Yarn Over, draw through 2 loops* repeatedly until 1 loop is left on hook.
2 rows/columns complete
Row/Column 3
With another whole row/column complete, this is what you’ll be looking at:
3 rows/columns complete
More Rows/Columns
After another few completed rows/columns, you’ll start to notice your dangling chains aren’t so dangly anymore. Each row/column uses up one at its base, and adds some strength to that edge of your shawl and helps ensure the completed shawl blocks into a gentle curve.
6 rows/columns complete
I hope this tutorial helps you get started on your own Pax Adventure!
You can find the pattern (using both UK and US crochet terms) here:
And remember, small, independent businesses like mine can only make it work through word of mouth, so leave a review if you liked this pattern, tell a friend if you loved it, and don’t forget to tweet about it too!
You have all your three mitten bits made, and it’s time to sew them all together.
Here’s how I did it:
First Things First
Weave in your ends and block your pieces. Tunisian Crochet fabric has a tendency to curl, you may have noticed. Tunisian Knit stitch is renowned for this feature. And as we’re working a pretty dense fabric for our mittens, that curl can be quite enthusiastic.
So blocking before you sew will ensure your panels behave (and look) far better.
All blocked and ready to rock!
With Wrong Sides facing in on Panels 1 & 2, seam up thumb side of wrist from Row 1 – Row 24 with Main Colour
Starting at the cuff, use a top / whip stitch to seam up edge of cuff.
Stop sewing when you complete the horizontal stripes. I like to add a few extra stitches to the last stripe to reinforce the edge.
First seam complete. Gorgeous!
Adding The Thumb
Then, with wrong sides still facing in, align marked st on thumb with top of wrist seam. Seam side of thumb with left Panel for 15 (17/19) sts.
Fold thumb in half lengthways and seam up edges to tip of thumb.
Use a whip / Top stitch for a flat thumb seam
weave a strand of yarn in and out around tip of thumb
pull firmly to close hole
Finishing Up
Beginning at top of wrist seam again, seam other side of thumb with other Panel for 15 (17/19) sts.
Begin sewing where indicated above.
continue seaming around edge of glove, and down other side of cuff.
Weave all your ends in, and you’re done!
One of the beautiful things about this method of construction is that it is infinitely adaptable.
If you find your hand fits better in a Large glove, but you thumb finds a Large thumb too roomy, you can down size to suit you. Similarly, if your thumb is larger than the mitten size that fits, you can shift that around too.
There is no need to rip back all your work to the base of the thumb and re-do it all. You just need to whip yourself up a new thumb and lash that on in. Super!
Tunisian Crochet has a symmetry problem, insofar as it has none.
You may have noticed that each row’s stitches are drawn from the last row’s stitches by pulling them out of the fabric on the side of your dominant hand. This barely matters when we’re working a large piece, or when a slight shift to the right or left can’t be noticed, but for colourwork, especially colourwork that contains decreases, it becomes pretty clear pretty fast.
My mitten designs include TSS2tog decreases towards the finger tips that help reduce the number of stitches, drawing the mitten tip to a pretty point. But, as they are colourwork mittens, the decreases pose a problem; while the decrease on the right of my fabric (my dominant side) looks lovely and neat, the one on the left gets all bitty and jagged.
Booooooo.
Compare the photos below to see what I mean:
The pink line on the left is made with regular TSS2tog sts and is jagged and broken as a result
The pink line on the left is made with a reversed TSS2tog and is neat and solid as a result
What we’re going to do in this tutorial is work the first TSS2tog as normal. No point in fiddling with perfection, right?
Then we’re going to use a blunt-ended darning needle (a bodkin) to simulate a TSS2tog in the opposite direction. Hold on to your hats, people. Things are about to get weird!
The First TSS2tog
Firstly, we’re going to work 1 TKS in yellow which is our Main Colour (MC), and then the first TSS2tog on the row in pink, our Contrast Colour (CC).
Make 1 TKS with Main Colour (MC)
Push hook TSS-wise through the next 2 sts, then YO with CC
Draw CC through both sts. (1 TSS2tog made)
After that, we’re going to work TKS sts across to within 3 sts of the end. Don’t forget to catch your floats!
Reverse TSS2tog
Here’s where our trusty bodkin comes into play.
Draw both strands to the front of the hook
Thread CC onto a bodkin
sew bodkin through next two sts in same direction as hook is pointing
Pull CC through fabric. Remove bodkin.
Return both strands to back of fabric
Place CC loop on hook.
Tighten CC loop.
Work final MC TKS st and draw up a final loop in chain
Work return pass as normal.
After a few rows of this malarkey, you’ll see the effect of your reverse TSS2tog stitches. So smooth!
Ogham (either pronounced OW-am or OG-am, depending on who you ask), is a native Irish writing system that is all of 2,000 years old.
It’s impossible now at such a remove to know exactly what it was most used for, but many of our surviving examples are carved into standing stones. A large number of those stones mark ancient boundaries between kingdoms, so the thought is that they were basically signs used to lay claim to certain tracts of land in the really early Medieval / Pre-Christian period in Ireland.
Ogham is a script made entirely of lines cut across a central spine, and is similar in many ways to Nordic Runes.
The Ogham script featured on my pattern sample is my name! A O I B H E is spelt out from cuff to finger tip, but I’m happy to say YOU get to choose what you’d like to put on your gloves to make them personal to you. Below, you will find a full alphabet (in Ogham order, rather than Aplbhabetical) and in the pattern you’ll find a blank chart so you can make your mittens absolutely unique.
All I ask is that you spell your words from bottom to top, like the ancient Irish did. 😉
Getting Charting
On your mitten you have a maximum of 37 lines. As some letters use up more space than others, I have added a line count to the side of each letter’s chart, so you can plot accordingly.
Some letters you may expect to see don’t exist in Ogham. Y, for instance, and V – but those can be represented well with close alternatives. In those cases, I have labelled the alphabet above with both variations, so you can make the best guess.
All you have to do now is decide with you wanna write, then print out the blank chart in your pattern, and add your letters in pencil.
Got a long name, or lots to say?
Luckily, Ogham can be used both letter-for-letter, or phonetically. So, a name like Jennifer can be condensed down to “Gnfr”, and still be totally Ogham-legit.
So, there you are, humming along, row after glorious row of Tunisian Crochet colourwork tumbling off your hook, and you pause for a moment to admire your progress. And that’s when you notice it.
“Oh god. I have a stitch out of place”.
Worse still, it didn’t just happen. It was the result of a momentary lapse in concentration two days ago! ack!
And you’re left with an unenviable question; “Do I frog, or do I live with it?” Neither option is very satisfying is it?
But luckily, my Mam taught me a third option when I was barely old enough to hold a pair of knitting needles. She called it “Swiss Darning”, which I think sounds elegant and fancy. I’ve heard it more commonly called “Duplicate stitch” these days, which has the virtue of being clear and descriptive. Whatever you chose to call it, trust me, you’ll be singing its praises.
Here’s how it works:
Examine your fabric and identify the problem
There should be white horizontal stitches to the left, and the white lines to the right should be one stitch shorter.
Thread a blunt needle (a bodkin) with a strand of the yarn you’re using. Pro Tip: If you can’t find a blunt needle, use a regular sharp darning needle and sew backwards with it. Be careful not to jab yourself, though!
In this case, I’m using Drops Flora in Denim Blue.
Getting Started
Secure your yarn at the back of your work. This will save you from accidentally sewing through your tail and making a mess of the wrong side of your fabric.
Bring bodkin to front of work at base of the stitch you wish to hide. Pull yarn through to front.
Push bodkin under next stitch up. Make sure bodkin passes cleanly thorugh BOTH strands of the stitch.
Draw yarn through stitch. Half of the white stitch is now hidden. Clever, huh?
Push bodkin back though the base of the white stitch.
Pull yarn to back of work. Hey presto!
I repeated the process on the next two horizontal lines above, and then I got to fixing the missing white stitches on the left side of the work, too.
Bring bodkin to front of work at base of the stitch you wish to hide. Pull yarn through to front.
Push bodkin under next stitch up. Make sure bodkin passes cleanly thorugh BOTH strands of the stitch.
Draw yarn through stitch. Half of the blue stitch is now hidden.
Push bodkin back though the base of the blue stitch.
Pull yarn to back of work. And we have a white stitch where once there was a blue one!
Far better than all that frogging and cursing, am I right?
Oh, hey! And, this also works for knitting, too. In fact, it was originally developed to add small colourowork detail to stocking stitch knitted fabric… so if you’re a knitter with basic skills, you’ve now learnt a fantastic way of sprucing up your knit stitches too!
Ogham is on sale right now. Get your PRE-ORDER DISCOUNT NOW!


 Legendary Shawls 1€20.00
 Anansi€6.00
 Finola€5.00