Posted on Leave a comment

One Square Granny

When my Mam taught me to crochet, she did so by handing me a Granny Square blanket she was working on, and teaching me to treble crochet clusters into her already beautifully crocheted fabric.

I focussed on the stitches, on how they danced around my hook, and how the fabric grew under my fingers as I crocheted towards the corner. Then she showed me how to add enough stitches to veer around it and start on the next straight side.

Because I didn’t have to struggle with magic loops or counting or seams, I was able to learn to love the craft from the moment I began, and it’s that reason I think this modified “one block” granny square pattern makes for the perfect pattern to introduce a new-comer to the craft.

Now, bare in mind crocheters, YOU will have to make the first 4 rows for your prospective crochet genius before you hand it over, but once you do, the rules simplify to a point where a beginner, even with very little crafting experience, can pick up the rhythm and crochet confidently.

Starting your gorgeous Granny Square

Note: This pattern is written using UK stitch terminology.

Make 6 chain stitches, 1 slip stitch into chain furthest from hook to make a loop.

6 chain stitches
make into a loop with one slip stitch

Round 1.
Into the loop, make 1 dc, 1 htr, 14 tr.

double crochet and half treble on 6-chain loop
14 treble crochet stitches added to loop

Note: This Granny Square has NO seams at the start or end of a round. In fact, because it’s worked in an ever-increasing spiral, there technically is no start or end of a round. As my Mam says, you simply crochet this square until you either run out of yarn or run out of patience – whichever comes first.


Round 2.

Into the gap between htr and 1st tr, make [3 tr].

the gap between the half treble and the first treble crochet stitch
3 treble crochet stitches in the gap

*sk 2 sts, work [3 tr] into next gap*, 6 times.
(This gives you 8 clusters, each with 3 trebles in them and 8 “gaps” between them.)

3-treble clusters all around the edge, separated by 2 trebles each on previous round

Round 3.

*Into next gap, make [6 tr], into next gap make [3 tr]

the next gap is the big one to the left of your hook
6 trebles crochet stitches in the gap outlined in previous image, and 3 treble crochet stitches int he next gap along

Repeat the above, 3 times.

Note: The 6-tr clusters are your corners, the 3-tr clusters make up the sides of your square.

4 corner clusters (6 trebles each) and 4 sides (made of a 3-treble cluster each) completed

Does it look a little wonky and warped? Sure!
It’s a spiral with corners after all, so it’s always going to be a little off-kilter. (Who among us isn’t a little wonky, though, right?)

But as I said in the intro, this is a great pattern to teach someone to make Granny Squares. It’s not an award winning masterpiece; it’s a starter kit.

Round 4.

Into middle of next 6-tr cluster make [6 tr], *into next gap make [3 tr]* twice.

One corner (6 trebles) and one side (2 sets of 3 trebles) complete.

Repeat for other the corners and three sides.

Your square is ready to hand over to your crochet student.
(Or maybe use it to start a One-Square Granny blanket of your own. They can have the next square you start! 😉

At this point, your Granny Square should have four identifiable corners, and enough gaps between clusters that your beginner has space to learn and practice.

After this, it’s simply a matter of remembering the two basic rules of Granny Square manufacture:

  1. When you encounter a gap, put three trebles in it.
  2. When you see a corner, split it in two and add 6 trebles in the middle.

Granny Squares are just pure, logical genius. So, if you follow those rules, your One Square Granny will be a success.

Once your beginner has a little practice, and muscle memory has started to develop, you can add chains between the clusters, or teach them a more complex square pattern with seamed rows, or multiple colours. But I guarantee you, this will remain a favourite thanks to its simplicity, its gorgeous texture and the fact that, with a little experience, you can carry on crocheting while watching TV and not miss a stitch!

Folks, I’m happy for you to use this pattern to teach classes and individuals.
All I ask is that if you get paid for teaching this using pattern, that you refer back to this page and link your students to it and my work.

Back To Top


Like what you see? Check these out!

Posted on Leave a comment

Aoibhe’s (Almost) Invisible Tunisian Crochet Seam – for the Wrong Side

Tunisian Crochet seams can often look botched and ugly.

Here’s how to make your Tunisian Crochet garments and accessories look seamless!

Start With Some Tunisian Crochet

In this case, I have made a lovely piece of Tunisian Simple Stitch which I’m going to seam along the first and last rows.

Keep the last row you made closest to you, with the Right Side facing outwards.

Setting Up the Seam

The first thing we’re going to do, is add a little slip stitch to the two corners of our seam. This will ensure the edge of our work is smooth.

  1. Find the V on the edge of your FIRST row and add a slip stitch to it.

2. Insert finger between sides to help control your work.

Now, we can get to the real seaming business:


This seam is made by “zipping” one side of your fabric to the other.
We will be pulling each bar/line on the LAST row through each bar/line on the First row, and securing it there with a UK dc / US sc.

Here’s how:

  1. Locate the nearest line/bar on the FIRST row

2. Insert hook into it

3. Locate the nearest line/bar on the LAST row

4. Insert hook into it

5. Secure LAST row loop with hook and…

6. Draw LAST row loop through FIRST row loop

First ‘zip’ complete

Time for a little traditional crochet!

* This seam won’t hold without a little help, so we’re going to add a UK dc / US sc st onto the loop left on the hook.
Let’s do it!

1. Yarn Over.

2. Draw Yarn Over through one loop

3. Yarn Over again.

4. Draw Yarn Over through both loops

Repeat the “zip and secure” sequence for each pair of bars/lines on your seam until you get to the end.

It will look like this at this stage.

The inside of a completed (Almost) Invisible Seam.

There’s just one final thing to do; slip stitch into the two corners to smooth out the edge.

Here’s how:

1. Insert hook into both corners.

2. Yarn Over.

3. Draw Yarn Over through everything else on hook.

Bind off. Weave in ends. You know the drill.

Then, when you flip your fabric the right way out, you notice your seam is (almost) invisible, nice and strong and flexible!

A completed (Almost) Invisible Seam

SIDE NOTE: You may ask, “Hey, Aoibhe, why not use a slip stitch throughout the seam? Surely that’d take less time, use less yarn and sit flush with the fabric, right?”

And I’d say, yes, it would. Technically.

But also, slip stitches have zero stretch and zero chill.

Tunisian fabric has a lovely level of 4-way stretch, and if you add a non-stretchy seam to one part, it’s bound to cause shaping, comfort and blocking issues.

So, while a double crochet is, indeed, a little bigger, uses a little more yarn and takes more time to do, it’s still a better choice over all.

Back To Top


Like what you see? Check these out!

Posted on Leave a comment

Aoibhe’s (Almost) Invisible Tunisian Crochet Seam – for the Right Side

Tunisian Crochet seams can often look botched and ugly.

Here’s how to make your Tunisian Crochet garments and accessories look seamless!

Start With Some Tunisian Crochet

In this case, I have made a lovely piece of Tunisian Simple Stitch which I’m going to seam along the first and last rows.

Right Side in, Wrong Side out. Last Row furthest away from you.

Setting Up the Seam

The first thing we’re going to do, is add a little slip stitch to the two corners of our seam. This will ensure the edge of our work is smooth.

  1. Find the V on the edge of your FIRST row.

2. Insert hook, from front to back, into it.

3. Yarn Over

4. Draw the Yarn Over through work and through loop on hook.

Now, we can get to the real seaming business:

This seam is made by “zipping” one side of your fabric to the other.
We will be pulling each bar/line on the LAST row through each bar/line on the First row, and securing it there with a UK dc / US sc.

Here’s how:

  1. Locate the nearest line/bar on the FIRST row

2. Insert hook into it

3. Locate the nearest line/bar on the LAST row

4. Insert hook into it

5. In order, from left to right:
LAST row loop, FIRST row loop, loop that was already on the hook.

6. Draw LAST row loop through FIRST row loop

First ‘zip’ complete

Time for a little traditional crochet!

* This seam won’t hold without a little help, so we’re going to add a UK dc / US sc st onto the loop left on the hook.
Let’s do it!

1. Yarn Over.

2. Draw Yarn Over through one loop

3. Yarn Over again.

4. Draw Yarn Over through both loops

Repeat the “zip and secure” sequence for each pair of bars/lines on your seam until you get to the end.

It will look like this at this stage.

A completed (Almost) Invisible Seam

There’s just one final thing to do; slip stitch into the two corners to smooth out the edge.

Here’s how:

1. Insert hook into both corners.

2. Yarn Over.

3. Draw Yarn Over through everything else on hook.

Bind off. Weave in ends. You know the drill.

Then, when you flip your fabric the right way out, you notice your seam is (almost) invisible, nice and strong and flexible!

A completed (Almost) Invisible Seam

SIDE NOTE: You may ask, “Hey, Aoibhe, why not use a slip stitch throughout the seam? Surely that’d take less time, use less yarn and sit flush with the fabric, right?”

And I’d say, yes, it would. But also, slip stitches have zero stretch and zero chill.

Tunisian fabric has a lovely level of 4-way stretch, and if you add a non-stretchy seam to one part, it’s bound to cause shaping, comfort and blocking issues.

So, while a double crochet is, indeed, a little bigger, uses a little more yarn and takes more time to do, it’s still a better choice over all.

Back To Top


Like what you see? Check these out!

Posted on Leave a comment

No-Gap Base Increase

How to increase the height of your Tunisian Crochet column, without leaving a hole in your fabric.

This is so quick to do. You’ll love it.

Start With Some Tunisian Crochet

In this case, I have a layer of crochet done, and have started into a second layer.
The layer I’m working on is three bars high.

If you want to do the same, go ahead, I can wait. It’s no bother. I can just go make a cup of tea.

A layer of linked stitches.

Work the Downward Pass

Pick up loops in all the bars, as you have done for every column of the row so far. Don’t work into the next base just yet. We’ll get to that in a second.

Do you see the hole at the base of your PREVIOUS column? Work your hook into it.

  1. Loops picked up. Hole at base of previous column visible to the left of thumb.

2. Hook into hole at base of previous column.

Yarn Over, and draw a loop through fabric.

This adds a loop to hook that wouldn’t have been there otherwise (an increase)

  1. Yarn Over

2. Extra Loop

Now, we continue the Downward Pass by working hook into NEXT base:

Hook worked into NEXT base along.

Yarn Over, and draw a loop through to front of fabric:

  1. Yarn Over

2. Pull through

Work Tunisian Crochet Upward Pass as usual

* Yarn Over, pull through two loops * repeatedly until one loop is left on hook.

The three bars are now accompanied by a fourth (at the bottom of the column).

You are now working with four bars where before, you only had three.

Here’s what a completed, taller layer will look like.

A three-bar layer has been transformed into a four-bar layer. Lovely job!

And here’s the whole thing in motion:

Back To Top


Like what you see? Check these out!

Posted on Leave a comment

Second Double Crochet Row

You have your first row of stitches complete, but now it’s time to start into the second row, and suddenly, everything looks different.

Here’s how you do it.

The Lay Of The Land.

Let’s look at what we’ve got.

In this instance, we have made 8 chains and skipped the one closest to the hook.
Then, we used the other seven chains to make double crochet stitches.
So far, so shiny.

a V-shape sits on top of every crochet stitch. Use them to count.

Make a turning chain

A ‘turning chain’ is just a regular chain stitch (Like the 8 chains we did at very the beginning). The only reason it has a different name is because it serves a different purpose.

In this case, it adds a little extra yarn to the edge of our fabric so that the edge won’t be tight and inelastic when we’re done.

Here’s how a chain is done:

  1. Yarn Over

2. Pull ‘Yarn Over’ through loop on hook to complete ‘Turning Chain’.

Now, turn your work.

Orientation is key here. When your turn is done properly, your tail should be at the bottom of your work, your hook should be at the top (On the right for right-handed people and on the left for left-handed people)

Hook at the top and tail (under right thumb) at the bottom.

Now it’s time to find your V’s

There is a V-shape on top of every stitch, but right now, they’re on the side of your fabric facing away from you. Turn your work so that you’re able to see the top. You’ll to find your V’s there.

The 7 V-shapes we had originally have been joined by an eighth. The V closest to your hook is the one belonging to the ‘turning chain’.

Skip over the ‘turning chain’, and find the next V along.

That’s where we’re going to put our first double crochet of this row.

It’s just a case of using the same dance steps we did on the first row to make a double crochet.

  1. Yarn Over

2. Pull ‘Yarn Over’ through to front of fabric.

3. Second Yarn Over

4. Pull ‘Yarn Over’ through BOTH of the loops on the hook. When you are back to one loop, the stitch is complete.

To begin our second stitch of this row, we need to look at the fabric we’ve made so far.

Under the double crochet we just completed, there is a hole. I have an arrow indicating its location in the next photo.

The hole tells you where you have already been.

This hole was made by your crochet hook when you created the last stitch. It tells you that you have already been in that section of fabric. So, when it’s time to insert your hook for double crochet number two, move to the left one space.

Hook inserted into SECOND stitch space, ready to make second double crochet

The second double crochet is created the same as the first. See photos below for a recap.

  1. Yarn Over

2. Pull ‘Yarn Over’ through to front of fabric.

3. Second Yarn Over

4. Pull the ‘Yarn Over’ through BOTH of the loops on the hook. When you are back to one loop, the stitch is complete.

Rather, Rinse, Repeat.

Every double crochet stitch you make on this and every other row will be created like the one above.

When the row is done, you should have something that looks a little like the image below.

Gorgeous!

Note: When you being a new row, don’t forget your ‘turning chain’!

Back To Top


Like what you see? Check these out!

Posted on 1 Comment

“Be Kind. Rewind” – What you can do to improve the tension and elasticity in your yarn

Have you ever considered the tension your yarn is under once it’s been wound into a cake or ball?
One of the main reasons yarn is sold in a skein is to preserve its elasticity. So, from the second you wind it, it’s being held at a stretch.

Animal fibres in particular have a gorgeous spring to them. If you stretch them, they snap back on release. This elasticity gives a finished garment a bounce and a wearability that is a pleasure to behold.

But if these fibres are held at their limit for too long, they can lose that elasticity entirely. That’s why you should only wind your skeins when you intend to knit or crochet with them soon after. It’s also why those old balls of donated yarn tend to seem so lifeless – they’ve been held at a stretch for decades. Yikes.

Ball winders and swifts are an amazing piece of kit I believe every crafter should invest in, but there’s a pull between swift and winder, so even they can add tension to a newly-wound skein.

Image (c) Ballyhoura Fibres http://www.ballyhourafibres.com

See the two cakes below?

They’re actually the exact same skein.
The one on the left has been wound directly from the skein on my swift.
The one of the right is the same ball, wound from the first cake into a second, much more relaxed cake.

Look at the size difference! And imagine the tension the first one would have been under had I only wound it once.

two cakes of yarn, illustrating the tension yarn can be under after one wind (left) and two winds (right) The elasticity of the cake on the right is more relaxed.
Same exact skein of yarn, first wind (left) second wind (right)

So, tell me. Are you kind to your yarn? Do you ever rewind?

And if you haven’t done it before now, have I convinced you to start? I sure hope so! And I bet your yarn will thank you, too!

Oh! And… psst! The yarn I’ve pictured here is a beautiful skein of Ballyhoura Fibre yarn. It’s Cierra’s 4-ply sock in colourway “Pot Pourri”. Watch out for it in a pattern this autumn!
You can find the link here: https://www.ballyhourafibres.com/


Like what you see? Check these out!

Posted on 7 Comments

The only Long Tail Cast On method you’ll ever need.

Knitters, don’t say I never give you guys anything!

This long Tail Cast On method is flawless.
You’ll never scrabble for yarn to make those last few stitches ever again.
Long Tail anxiety will be a thing of the past! And it’s so gosh darn easy.

Let me show you how.

Before we begin our long tail cast on.

Start off with your needle, and both ends of your yarn ball. Every ball has an inside end and an outside end. Fish them both out and have them ready to rock like this.

two strands of yellow yarn set horizontal on a table top. A sinle knitting needle is being held above them, ready for a long-tail cast on.
Inside and Outside yarn ends and my 6 mm knitting needle

Knot the ends together

Yea, no… seriously.
I know a lot of knitters are averse to knots, but don’t worry, you can undo it later.
For now, gather your courage and make that knot!

a hand points to a knot joining two strands of yarn. Both strands are feeding out of the same ball of yellow yarn.
Leave a good 6 inches between the knot and the ends. You’ll sew the ends in later.

Slip the needle between strands.

Your first cast on stitch is an easy one. Just pop your needle between the strands, and place the knot flush with your needle.
The front strand will act as your long tail, the back strand will make up your cast on stitches.

a knitting needle sits between two strands of yarn. The knot holding them together is pressed against the side of the needle.
keep the knot pressed against the needle.

And then set your hands up as you would for a regular old long tail cast on.
Remember, the thumb holds the long tail, the index finger holds the new stitch.

a pair of hands holding two strands of yellow yarn, ready to start making long-tail cast on stitches.
Pro tip. Check the knot is still lying against the needle. We don’t want it wandering off anywhere!

After that, it’s just a matter of casting on as normal.
The bonus here is that your long tail will be exactly as long as you needed it to be because you’re feeding yarn out of your ball as you need it.

a knitting needle holding 24 cast on stitches. A hand holds two strands of yarn in long-tail fashion.
Aren’t they gorgeous?

Do you have a tail or two more to weave in at the end?
Sure you do, but I think that’s a small price to pay for the peace of mind you get from possessing an infinite long tail!

Once you’ve cast on everything you need…

Simply snip the long tail strand…

a set of 24 stitches on a knitting needle sits on a table. A hand points to a cut in one piece of yarn that is feeding off the newly cast-on stitches.
Snip snip!

…and carry on knitting merrily.

several rows of garter stitch in yellow yarn being held above a table by a pair of hands. The ball lies on the table in the background slightly out of focus.
Happy Days!

Back To Top


Like what you see? Check these out!
They’re both knit/crochet combo patterns.

Posted on Leave a comment

Making an Invisible Crochet Decrease

If you’re a lover of the cute and cuddly world of amigurumi, and you want to improve the look of your finished crochet toys, this post is for you.
Crochet fabric is highly textured, but your eye can be drawn to any disturbances in that texture, rather than to your hard work and crochet skill. Making an invisible crochet decrease is a really good way of keeping your fabric smooth and unblemished.

Read on to see how this clever little trick is done.

Cut to the Chase, Aoibhe!
Click here for a small video demo

Start off with a piece of crochet

This is the beginning of one of my Patreon Amigurumi patterns.
To be specific, it’s my Meerkat’s bum.

I’ve gone round and round with regular increases (which are naturally pretty invisible, so we don’t need to worry so much about them showing up), and now it’s time to start decreasing towards the neck.

a piece of beige, unfinished amigurumi crochet is held in a pair of hands over a worn wooden table surface.
Meerkat bum!

The Lay of the Land

In my hand below, you can see the edge of my crochet fabric.
I’m working in UK double crochet / US single crochet stitches, as these are nice and dense and will make a good solid fabric for my amigurumi.

When you focus on my index fingers (behind the fabric), you’ll spot a stitch sitting between them. That’s my next stitch along, and it’s where I’ll begin the invisible crochet decrease.

a close up of a row of single crochet stitches, a steel hook and a pair of hands.
Locate the next stitch along

Ready to Crochet?

Press your hook through the FRONT LOOP ONLY of that highlighted stitch.
I like to stretch it out a little as this makes it easier to work the rest of the stitch without your hook getting caught later on.

A crochet hook in a piece of fabric
Hook into front loop
a crochet hook stretching out a stitch to make it looser
Biiiig stretch

Then, find the next stitch along, and work your hook into both sides of that stitch’s V.

a crochet hook being worked into a piece of single crochet fabric as an invisible decrease is made.
Hook into next stitch along

Yarn Over hook, and draw that Yarn Over back through only the stitch you just worked into.
Everything else on your hook stays where it is for now.

a yarn over on a steel crochet hook. The has been inserted into a an unfinished amigurumi toy.
Yarn Over…
Three loops on a crochet hook.
Draw Yarn Over back through both sides of the stitch’s V

Yarn Over again, and draw that Yarn Over through all the loops remaining on your hook.
Your Invisible Crochet Descrease is complete!

An invisible single crochet decrease stitch, half complete.
Yarn Over…
A completed invisible single crochet decrease stitch.
Draw Yarn Over through everything on hook

Spot the Invisible Decreases

In the image below, there are six invisible decreases.
Can you spot them?

That’s how good they are.

A close up of some amigurumi fabric, with several invisible decreases dotted throughout. As you might imagine, they are, indeed, invisible.
Spot the decreases

Invisible Crochet Decrease – A Spotter’s Guide

They’re elusive, that’s for sure.
But if you’re checking your stitches and counting as you go, it’s important that YOU can find them.

So, look at the Wrong Side of your fabric (i.e. the inside of your amigurumi), and you’ll spot the tell-tale signs of your decreases there. Use the slider below to see my decreases in situ.
(They’re the little horizontal lines the blue arrows are pointing towards)

And if you’d like to see more of my Crochet Buddies collection, you can browse them all here.
Joining my Patreon family will get you one or two of these patterns every month as a gift – depending on your chosen tier level.

I hope you like ’em!

Three completed amigurumi toys laid out on a worn wooden table top.
From left to right: a crochet cow, koala and giraffe.

The koala and giraffe are being held up by one hand each.
Cow, Koala and Giraffe say Hello!

Video Demonstration of an Invisible Crochet Decrease.

Back To Top


Like with you see? Check these out!

Posted on Leave a comment

Adding Relief Stitches to Tunisian Crochet fabric.

Tunisian Crochet has texture for daaays.
It’s one of the things I love the most about it. From that gorgeous stripe on Simple Stitch, to the squishy bounce of Knit Stitch, you can’t go wrong with a little TC. But sometimes, you wanna turn the volume up on that texture. That’s where Tunisian Crochet Relief stitches come in.

You can use it to add ribbing and cables to your crochet or a simple POP! to the edge of your fabric.

Read on to see what I mean.

Less Talky, More Show-y?
Click here for a small video demo

Make a Piece of Tunisian Simple Stitch

To begin, work a few rows of 13 TSS per row.

Starting off. A small piece of Tunisian Simple Stitch fabric.

Let’s Get Set Up

Below you’ll see I’ve worked the first 5 TSS on the next row, and added 1 Yarn Over to my hook.
That gives me 7 loops on the hook in total.

Yarn Over on hook

Next, make a TSS3tog decrease.

To make a TSS3tog, slide hook into the next 3 lines, Yarn Over, and draw loop back through all three lines.

Hook in…
Yarn Over and draw through

Once you have that done, add another Yarn Over to the hook, and complete the row as usual.

Yarn Over…
Work TSS sts for the rest of the row

At the end of the Forward Pass, we use the same rule as always for the Return Pass.
That rule?
Yarn Over and draw through one loop, then *Yarn Over and draw through two loops* repeatedly until you are back to one loop on the hook.
(Psst! Treat each loop the same, whether it’s a Yarn Over, or a legit stitch.)

That’s the “Foundation Row” complete

And, this is what your row will look like after all those “YOs and pull throughs” are complete.

Two eyelets with a TSS3tog decrease in the middle

As you can see above, our decrease is now flanked by two lace eyelets made by those lovely Yarn Overs we added. Those eyelets will be used to anchor the beginning of our relief work.

One Last Thing, before we get to the Crochet Relief Stitches

Complete one more row of regular Tunisian like this:

Work TSS sts up to the first eyelet. Then press hook from front to back into eyelet.

5 TSS sts on the hook (Making 6 loops in total)
Hook through first eyelet

Yarn Over Hook, and draw the Yarn Over back to the front of the fabric.

Yarn Over…
Draw through eyelet to the front again

Press hook into next stitch (This will be the stitch coming out of the previous row’s TSS3tog)
Yarn Over Hook, and draw the Yarn Over through stitch.

Hook in…
Yarn Over and draw through

Find the second eyelet, and press hook through it to the back of the fabric.

Identifying the eyelet
Hook in second eyelet

Yarn Over and draw the Yarn Over through eyelet to the front again.

Yarn Over…
…and draw through

Complete the Forward Pass of the row as usual…

And then work the Return Pass to complete the row.

Ready to make your first Tunisian Crochet Relief Stitch!

Everything is all set up, so we can now get to our Tunisian Crochet Relief Stitches!
First thing we need to do is work the first 6 TSS sts.
This will bring our hook up to (but not into!) the st directly over the TSS3tog.

Then, Yarn Over on your hook TWICE.

6 TSS sts made (Giving you 7 loops on your hook)
Yarn Over TWICE

Push hook through first eyelet to the back of the fabric…
Then weave it back to the front of the fabric through the second eyelet.

In one…
and out the other

Yarn Over, and draw that newest Yarn Over back along the path your hook hook.
i.e through the second eyelet to the back of your fabric, then forward to the front of your fabric through the first eyelet.

Yarn Over…
…and draw through

To complete your first Relief Stitch work the following:
*YO, draw through two loops* twice.

First Relief Stitch complete

If you’d like to see your relief stitch a little clearer, fold the fabric in front of your hook back. Your Relief Stitch will stand out better.

A better view of the completed Relief Stitch

Complete the rest of the Forward Pass as usual, starting with the stitch directly above the second eyelet.
(There is a stitch behind the Relief Stitch that should remain unsued)

These two photos below are what it looks like once you have the Forward Pass of the row complete.

Relief Stitch in place
Thumbs highlighting the Relief Stitch

When your Return Pass is all done and dusted, this is what it will look like.
As you can see in the second photo below, a nice big gap exists betwen the relief stitch and the body of the fabric. That gap will be used to attach the next row’s Relief Stitch to the first one.

Return Pass complete
Check for the gap before continuing.

Pro Tip.
If you have difficulty controlling the gap, pop a lockable stitch marker in there.

Second Relief Stitch

Start your second Relief Stitch by adding one Yarn Over to your hook.
Then press your hook into and through the gap we just checked out.

Yarn Over
Through the gap

Yarn Over, and draw the Yarn Over back through the gap.

Yarn Over…
Back through the gap

Yarn Over, and draw through two loops.

Yarn Over, draw through two loops complete
And this is what the row looks like with the Return Pass complete

Work the Return Pass as per usual, folks.

On every relief row after this, work the same instructions you used for the second relief row.
After a few rows, it’ll start to look like this little piece of gorgeousness below.

Several Relief Stitch rows complete

Final Thoughts

Now, some of you may be asking “But, Aoibhe! Why did you use TWO Yarn Overs on the first one, and only ONE thereafter?”

And I’d answer that by complimenting your eagle eyes, and by telling you that for the first relief stitch, we had two rows to work over, so it needed to be a bit longer.

The rest of the relief stitches will only have one row to work over, so they get to be a little shorter.

Additionally, if I worked all the relief stitches with two Yarn Overs, they’d be saggy and loose, and would catch on ev-ery-thing when you wore it.

So, there you go!
Well done!

Video Demonstration of a Tunisian Crochet Relief Stitch

Back To Top


Like with you see? Check these out!

Posted on 4 Comments

Get a good fit on your sweater yoke with this calculator

Like many crafters, I can struggle to get a good fit on my home-made sweaters.
Sweater yokes I have designed from scratch are a particular challenge, so I have put together a sweater yoke calculator to help.

A sweater yoke make of pink yarn is displayed on a mannequin against a plain pink wall.
The yoke is made of Tunisian Crochet Simple Stitch and has been calculated using a sweater yoke calculator.

Sweaters Are Tricky

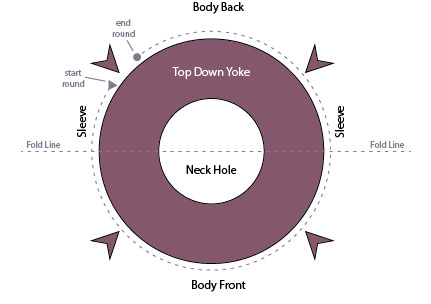
When you have a sweater yoke (the circle of knit or crochet fabric which will go over your head and over your shoulders, upper back and upper bust) and you’re ready to split up the stitches to focus on making the body and the sleeves, it’s not a simple question of quartering the number and knitting merrily onward.

If you use an equal number of stitches for the front, back and each sleeve, you’ll end up with a body that’s too narrow and sleeves that billow and buckle.

A Sweater Yoke Calculator will help you get a good fit on your next hand-made project.

Practice Makes Perfect, But a Calculator Helps!

I have made many sweater yokes over the years with too many stitches, or not enough rows, and each new make has seen me refine my maths and fiddle with my technique to the point where now, I have it down to a tee.

I transferred my own calculations from the back of an envelope into a handy sweater yoke calculator.
To use it, count your yoke stitches, feed that number into the calculator, and you’ll know exactly how many stitches you need to section off for your sleeves, for your front and for your back.

Give it a go!

Two columns
Vertical
Horizontal
Insert Yoke Stitch Count Here:
Summary
Name Total
"{{getWooProductName}}" has been added to your cart
Have a promocode?
Promocode Hide Show


One thing to note:

This calculator may occasionally be off by one stitch in its final result. It’s not that you miscounted anything.
It’s a product of fractions being rounded up and down to the next full number. Please take care to count your separated stitches and correct this small error before you begin knitting or crocheting again.

If you’d like a bit of guidance and a little extra fitting advice to accommodate broad shoulders, large busts and wide upper arms, click here for a helpful tutorial.