Lately, I’ve been trying to settle on a colour palette for future clothes making endeavours. I’ve been researching, reading colour theory, comparing eras…
If you’d told me I had ALREADY chosen a colour palette, I’d have disagreed. But here I am, organising my winter hand mades and clearly… CLEARLY… I have already decided.
Muted secondary colours it is, I guess!
This is a collection of knitting, crochet and machine sewing. Each piece is designed and drafted by me, made by me to my taste out of fabrics and yarns I’ve chosen for texture or colour, or dyed til I was satisfied.
Each piece is made to fit me.
I’ve no sizing information. No idea what size each one corresponds to in real terms. They each make me comfortable in my skin because they conform to me, not the other way around and there’s power in that.
You have all your three mitten bits made, and it’s time to sew them all together.
Here’s how I did it:
First Things First
Weave in your ends and block your pieces. Tunisian Crochet fabric has a tendency to curl, you may have noticed. Tunisian Knit stitch is renowned for this feature. And as we’re working a pretty dense fabric for our mittens, that curl can be quite enthusiastic.
So blocking before you sew will ensure your panels behave (and look) far better.
All blocked and ready to rock!
With Wrong Sides facing in on Panels 1 & 2, seam up thumb side of wrist from Row 1 – Row 24 with Main Colour
Starting at the cuff, use a top / whip stitch to seam up edge of cuff.
Stop sewing when you complete the horizontal stripes. I like to add a few extra stitches to the last stripe to reinforce the edge.
First seam complete. Gorgeous!
Adding The Thumb
Then, with wrong sides still facing in, align marked st on thumb with top of wrist seam. Seam side of thumb with left Panel for 15 (17/19) sts.
Fold thumb in half lengthways and seam up edges to tip of thumb.
Use a whip / Top stitch for a flat thumb seam
weave a strand of yarn in and out around tip of thumb
pull firmly to close hole
Finishing Up
Beginning at top of wrist seam again, seam other side of thumb with other Panel for 15 (17/19) sts.
Begin sewing where indicated above.
continue seaming around edge of glove, and down other side of cuff.
Weave all your ends in, and you’re done!
One of the beautiful things about this method of construction is that it is infinitely adaptable.
If you find your hand fits better in a Large glove, but you thumb finds a Large thumb too roomy, you can down size to suit you. Similarly, if your thumb is larger than the mitten size that fits, you can shift that around too.
There is no need to rip back all your work to the base of the thumb and re-do it all. You just need to whip yourself up a new thumb and lash that on in. Super!
Tunisian Crochet has a symmetry problem, insofar as it has none.
You may have noticed that each row’s stitches are drawn from the last row’s stitches by pulling them out of the fabric on the side of your dominant hand. This barely matters when we’re working a large piece, or when a slight shift to the right or left can’t be noticed, but for colourwork, especially colourwork that contains decreases, it becomes pretty clear pretty fast.
My mitten designs include TSS2tog decreases towards the finger tips that help reduce the number of stitches, drawing the mitten tip to a pretty point. But, as they are colourwork mittens, the decreases pose a problem; while the decrease on the right of my fabric (my dominant side) looks lovely and neat, the one on the left gets all bitty and jagged.
Booooooo.
Compare the photos below to see what I mean:
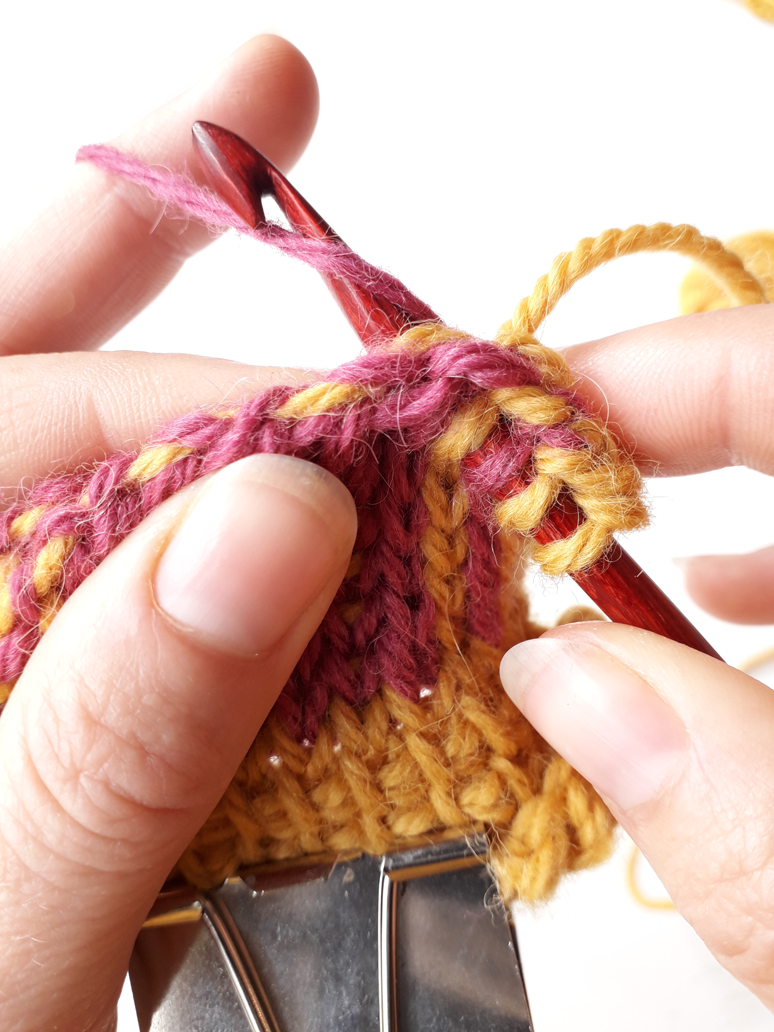
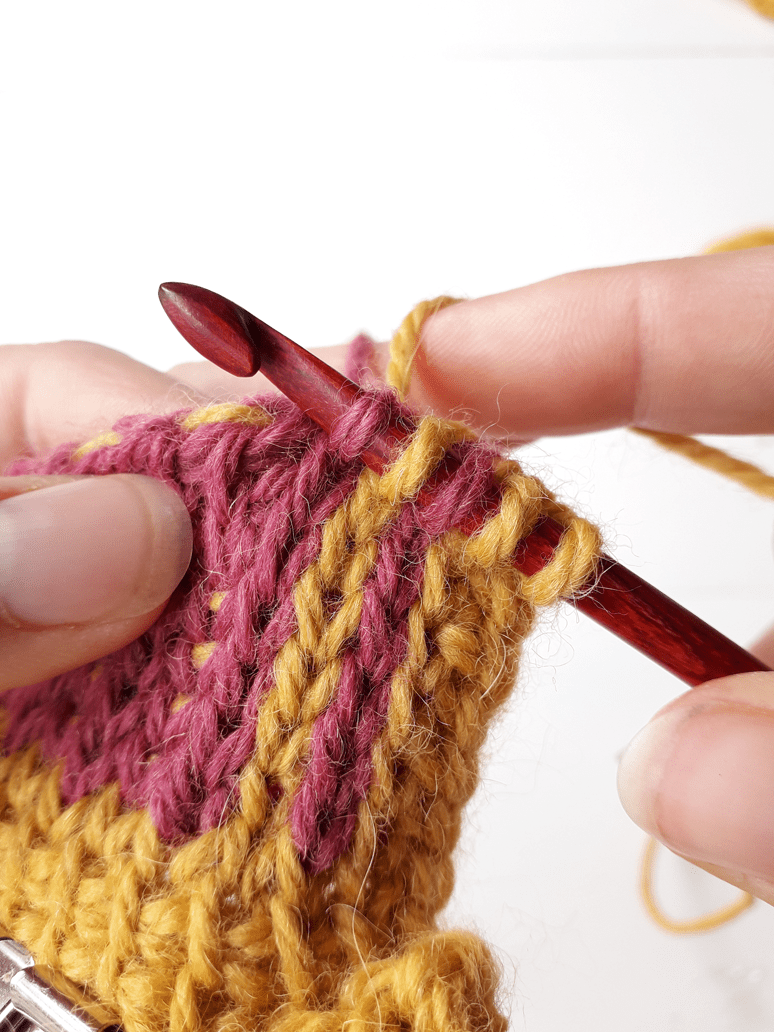
The pink line on the left is made with regular TSS2tog sts and is jagged and broken as a result
The pink line on the left is made with a reversed TSS2tog and is neat and solid as a result
What we’re going to do in this tutorial is work the first TSS2tog as normal. No point in fiddling with perfection, right?
Then we’re going to use a blunt-ended darning needle (a bodkin) to simulate a TSS2tog in the opposite direction. Hold on to your hats, people. Things are about to get weird!
The First TSS2tog
Firstly, we’re going to work 1 TKS in yellow which is our Main Colour (MC), and then the first TSS2tog on the row in pink, our Contrast Colour (CC).
Make 1 TKS with Main Colour (MC)
Push hook TSS-wise through the next 2 sts, then YO with CC
Draw CC through both sts. (1 TSS2tog made)
After that, we’re going to work TKS sts across to within 3 sts of the end. Don’t forget to catch your floats!
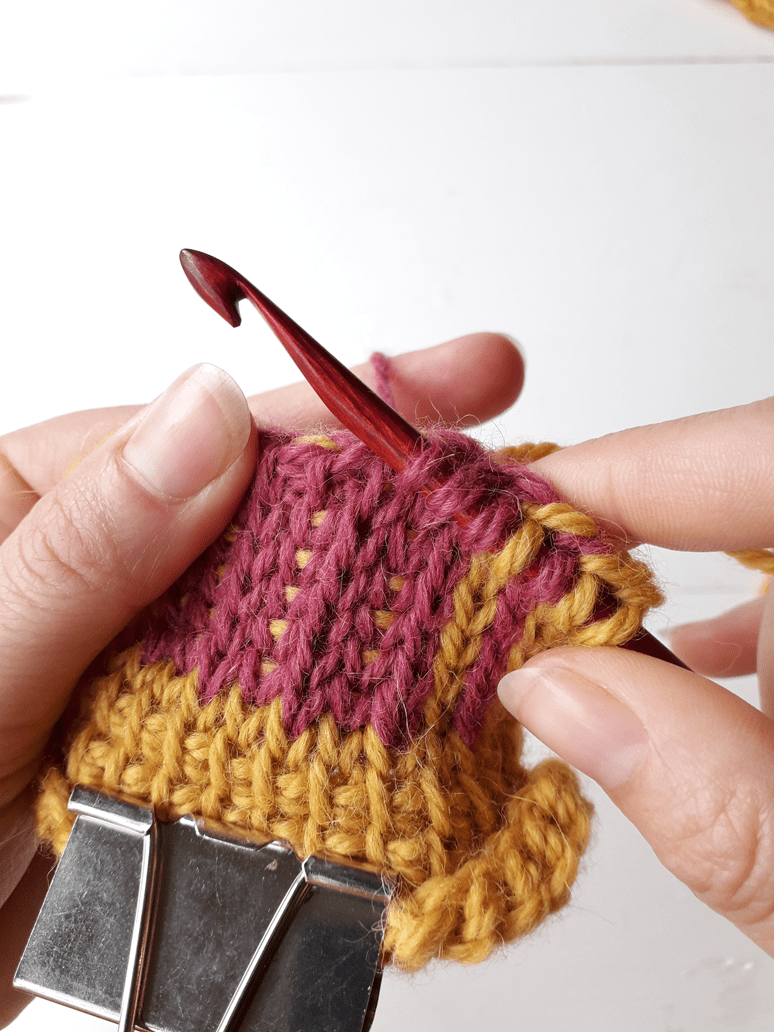
Reverse TSS2tog
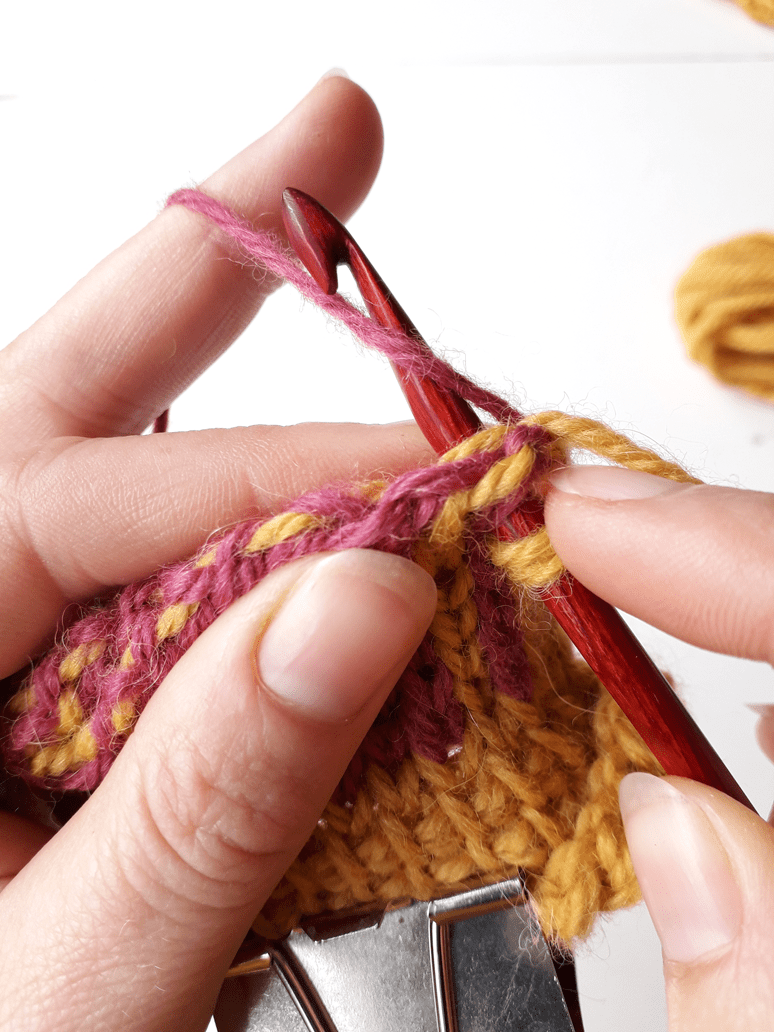
Here’s where our trusty bodkin comes into play.
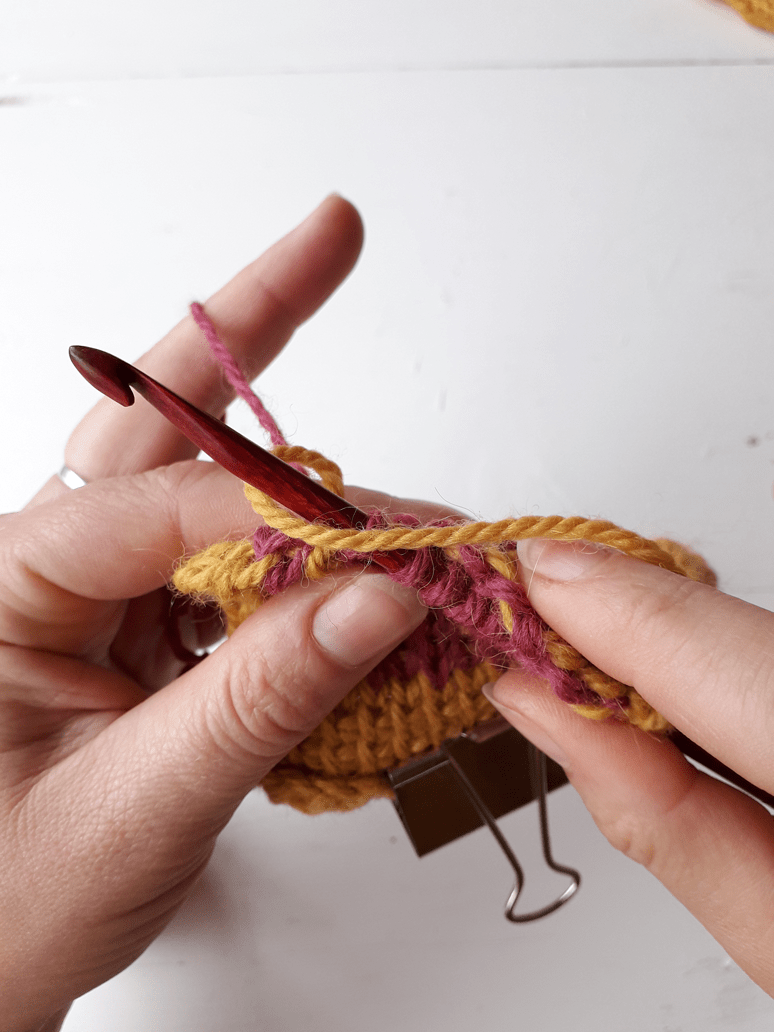
Draw both strands to the front of the hook
Thread CC onto a bodkin
sew bodkin through next two sts in same direction as hook is pointing
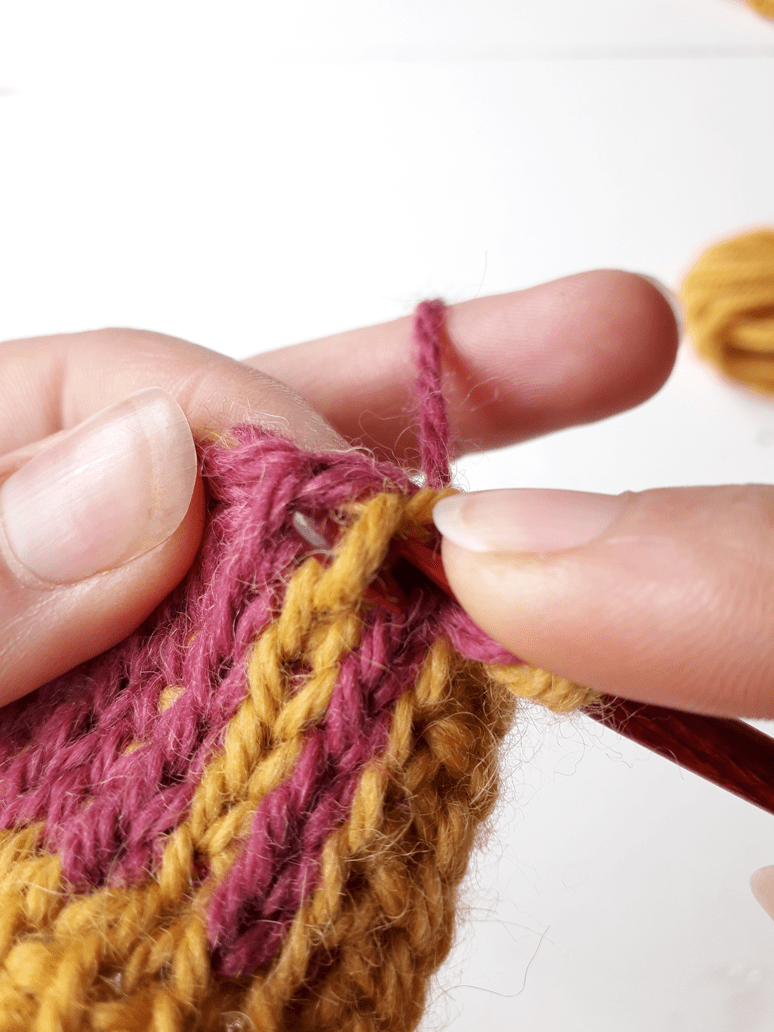
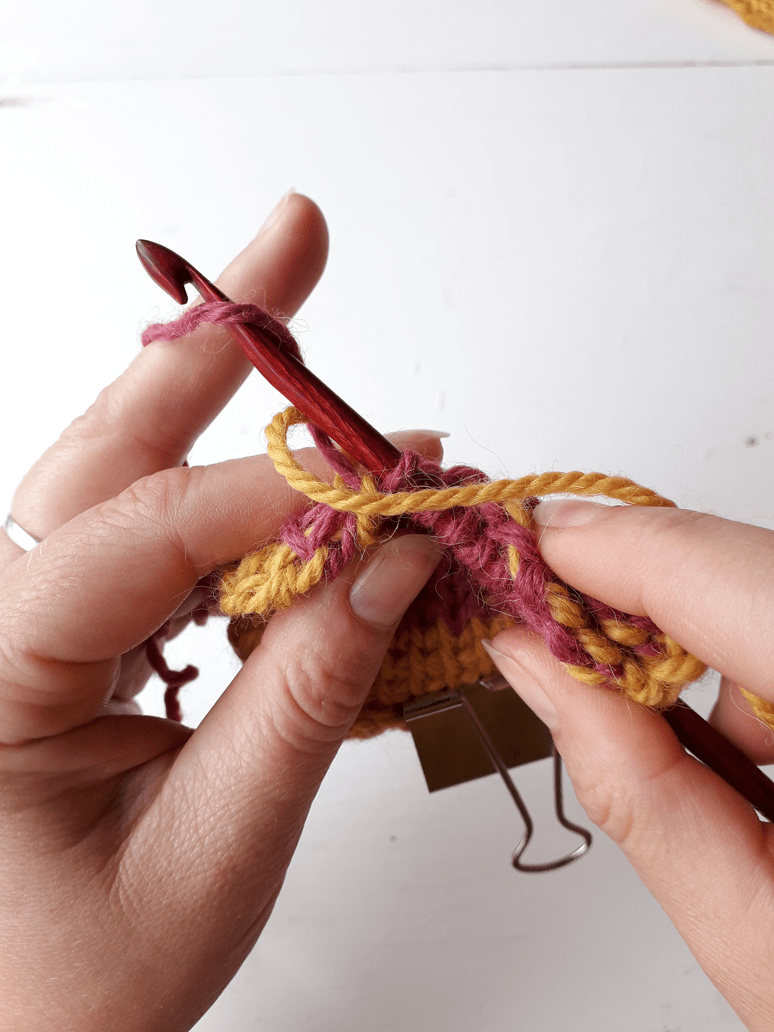
Pull CC through fabric. Remove bodkin.
Return both strands to back of fabric
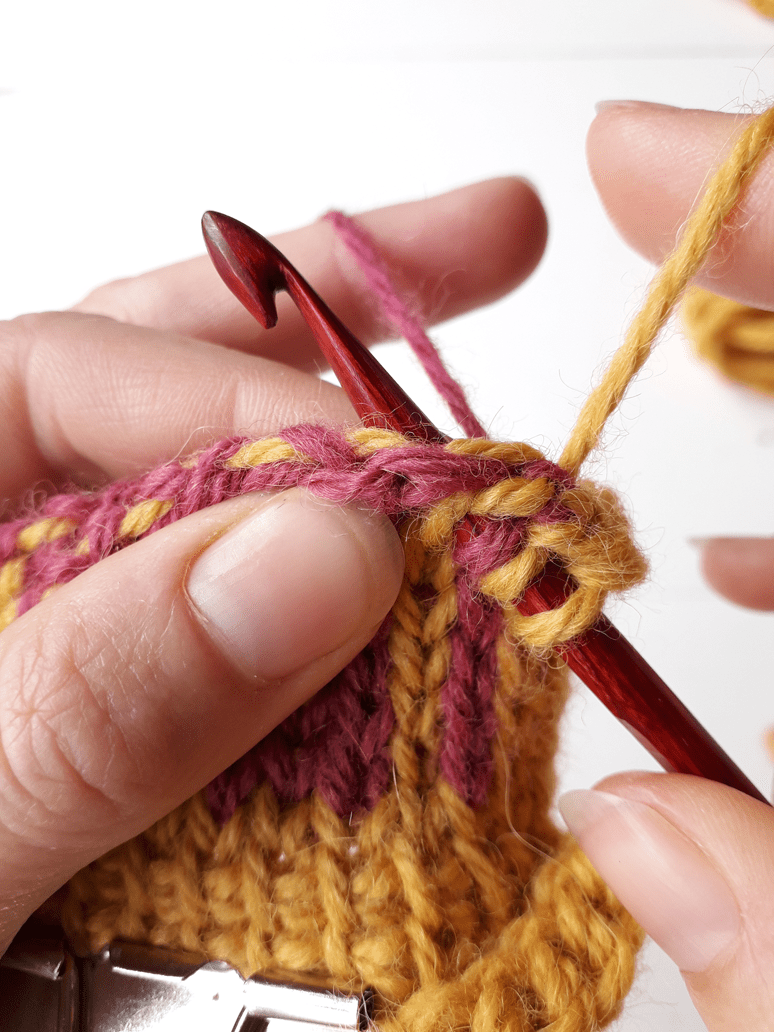
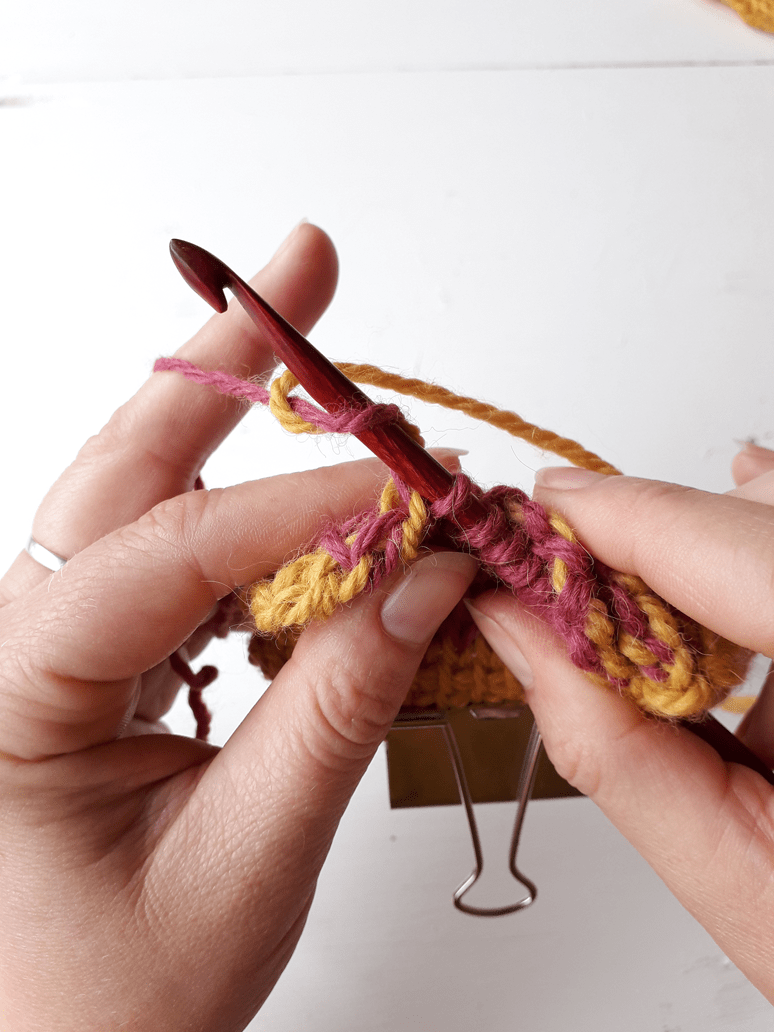
Place CC loop on hook.
Tighten CC loop.
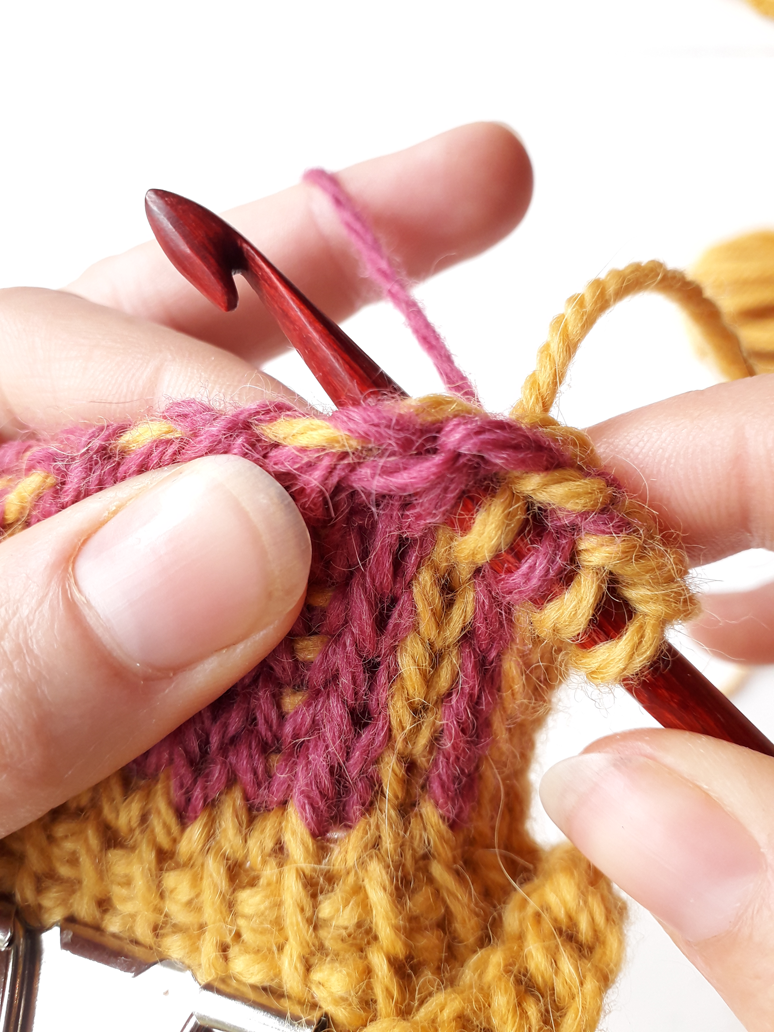
Work final MC TKS st and draw up a final loop in chain
Work return pass as normal.
After a few rows of this malarkey, you’ll see the effect of your reverse TSS2tog stitches. So smooth!
Ogham (either pronounced OW-am or OG-am, depending on who you ask), is a native Irish writing system that is all of 2,000 years old.
It’s impossible now at such a remove to know exactly what it was most used for, but many of our surviving examples are carved into standing stones. A large number of those stones mark ancient boundaries between kingdoms, so the thought is that they were basically signs used to lay claim to certain tracts of land in the really early Medieval / Pre-Christian period in Ireland.
Ogham is a script made entirely of lines cut across a central spine, and is similar in many ways to Nordic Runes.
The Ogham script featured on my pattern sample is my name! A O I B H E is spelt out from cuff to finger tip, but I’m happy to say YOU get to choose what you’d like to put on your gloves to make them personal to you. Below, you will find a full alphabet (in Ogham order, rather than Aplbhabetical) and in the pattern you’ll find a blank chart so you can make your mittens absolutely unique.
All I ask is that you spell your words from bottom to top, like the ancient Irish did. 😉
Getting Charting
On your mitten you have a maximum of 37 lines. As some letters use up more space than others, I have added a line count to the side of each letter’s chart, so you can plot accordingly.
Some letters you may expect to see don’t exist in Ogham. Y, for instance, and V – but those can be represented well with close alternatives. In those cases, I have labelled the alphabet above with both variations, so you can make the best guess.
All you have to do now is decide with you wanna write, then print out the blank chart in your pattern, and add your letters in pencil.
Got a long name, or lots to say?
Luckily, Ogham can be used both letter-for-letter, or phonetically. So, a name like Jennifer can be condensed down to “Gnfr”, and still be totally Ogham-legit.
Autumn in Ireland is a mad awl caper. Yesterday it was 22 degrees and the sun was splitting the rocks. Today, we’ve got hail stones clattering against the skylight with a wild fury.
This time of the year, I find, is the hardest to dress for. There’s a saying in Ireland. “If you don’t like the weather here, wait five minutes!”
So, the solution inevitably becomes a question of layers: Bring a hat you can take off if the sun god decides to return with a vengence. But don’t forget your shawl in case the north winds whip up a squall and send you shivering for shelter!
These are my 4 favourite patterns for “crazy weather crochet”.
Sunny Hat (below left) is an elegant blend of a knitted garter stitch band and segments of Tunisian Simple Stitch. Added bonus, you’ll find a crochet version of the knitted band here, if you’re not feeling knitterly inclined. Use Dusty Dimples Dusty Sock yarn in colourway “Foxy” to get that gorgeous golden glow.
Red Currant Shawl (above right) uses Tunisian Knit Stitch and a 4.5 mm hook as a starting point, then the fun begins with a mosaic of interlocking Simple Stitch squares. You can use a variety of hook sizes on this one to add extra depth and drape to the finished product. Mine is made with a firm favourite of mine, Fyberspates Scrumptious 4-ply.
Lop Top (below left) is the odd one out in this bunch – it uses ALL traditional crochet techniques. Yes! This autumnal tee is made using Back Loop and Front Loop single crochet stitches. I made mine with Twilley’s Of Stamford DK yarn.
And Morrigan (above right) is my absolute hero whenever there’s a sudden outbreak of bad weather. Made with a lace weight wool, it’s light and portable, but it packs a punch nevertheless.
Make this one with Cushendale Lace yarn for some added ruggedness. Morrigan is the outer layer you’ll never leave home without.
So, there you are, humming along, row after glorious row of Tunisian Crochet colourwork tumbling off your hook, and you pause for a moment to admire your progress. And that’s when you notice it.
“Oh god. I have a stitch out of place”.
Worse still, it didn’t just happen. It was the result of a momentary lapse in concentration two days ago! ack!
And you’re left with an unenviable question; “Do I frog, or do I live with it?” Neither option is very satisfying is it?
But luckily, my Mam taught me a third option when I was barely old enough to hold a pair of knitting needles. She called it “Swiss Darning”, which I think sounds elegant and fancy. I’ve heard it more commonly called “Duplicate stitch” these days, which has the virtue of being clear and descriptive. Whatever you chose to call it, trust me, you’ll be singing its praises.
Here’s how it works:
Examine your fabric and identify the problem
There should be white horizontal stitches to the left, and the white lines to the right should be one stitch shorter.
Thread a blunt needle (a bodkin) with a strand of the yarn you’re using. Pro Tip: If you can’t find a blunt needle, use a regular sharp darning needle and sew backwards with it. Be careful not to jab yourself, though!
In this case, I’m using Drops Flora in Denim Blue.
Getting Started
Secure your yarn at the back of your work. This will save you from accidentally sewing through your tail and making a mess of the wrong side of your fabric.
Bring bodkin to front of work at base of the stitch you wish to hide. Pull yarn through to front.
Push bodkin under next stitch up. Make sure bodkin passes cleanly thorugh BOTH strands of the stitch.
Draw yarn through stitch. Half of the white stitch is now hidden. Clever, huh?
Push bodkin back though the base of the white stitch.
Pull yarn to back of work. Hey presto!
I repeated the process on the next two horizontal lines above, and then I got to fixing the missing white stitches on the left side of the work, too.
Bring bodkin to front of work at base of the stitch you wish to hide. Pull yarn through to front.
Push bodkin under next stitch up. Make sure bodkin passes cleanly thorugh BOTH strands of the stitch.
Draw yarn through stitch. Half of the blue stitch is now hidden.
Push bodkin back though the base of the blue stitch.
Pull yarn to back of work. And we have a white stitch where once there was a blue one!
Far better than all that frogging and cursing, am I right?
Oh, hey! And, this also works for knitting, too. In fact, it was originally developed to add small colourowork detail to stocking stitch knitted fabric… so if you’re a knitter with basic skills, you’ve now learnt a fantastic way of sprucing up your knit stitches too!
Ogham is on sale right now. Get your PRE-ORDER DISCOUNT NOW!
A note or two on this exercise: 1. Don’t be alarmed by the giant bull clip on the end of my fabric! It’s just there to counter this thick fabric’s tendency to curl. 2. The middle (Yellow) block of colour is where we will be catching floats. 3. I started with 15 chains and worked a few rows of 13 TSS before I got stuck into the stranded colourwork TKS section
In this example I have worked a few individual stitches before we get to the float-catching section of the exercise. These are worked using alternating yarns like so:
A. Insert hook TKS-wise into 1st st, Yarn Over with Main Colour (MC) and pull loop through onto hook – 2 loops on hook.
snuggle hook under bar
push out to back of fabric
yarn over with Main Colour & pull yarn through fabric
B. Insert hook TKS-wise into 2nd st, Yarn Over with Contrast Colour (CC) and pull loop through onto hook – 3 loops on hook.
snuggle hook under bar
push out to back of fabric
yarn over with Contrast Colour (CC) & pull yarn through fabric
C. Insert hook TKS-wise into 3rd st, Yarn Over with MC and pull loop through onto hook – 4 loops on hook.
snuggle hook under bar
push out to back of fabric
Yarn Over with MC & pull yarn through fabric
Here’s the lay of the land right now:
Exercise 1 – Catching Contrast Colour Floats on the Forward Pass.
Are you ready?
We will be crocheting with MC and “catching” the CC yarn as a “float”. The resulting stitch will be MC (yellow) but the back of the st will have the strand of CC (pink) running through it.
insert hook TKS-wise into next stitch
Yarn Over with CC
Yarn Over with MC
return CC to back of fabric
draw MC through fabric
The next MC st along can be completed as usual.
insert hook TKS-wise into next stitch
Yarn Over with MC
Draw Yarn Over through fabric
There is no need to catch a float with every single stitch. Usually, I just catch every even-numbered stitch in a block of colour. You may choose to do it less frequently if you prefer, but if you are making mittens, I recommend you catch your floats pretty frequently so they don’t snag on wiggly fingers or chipped nails.
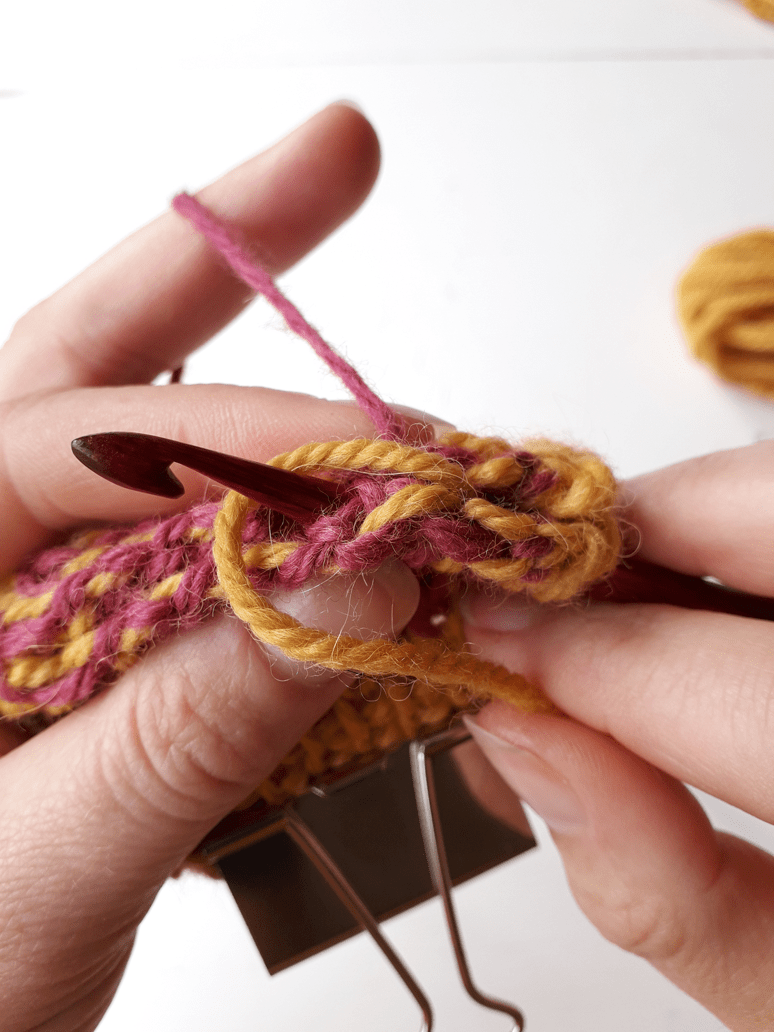
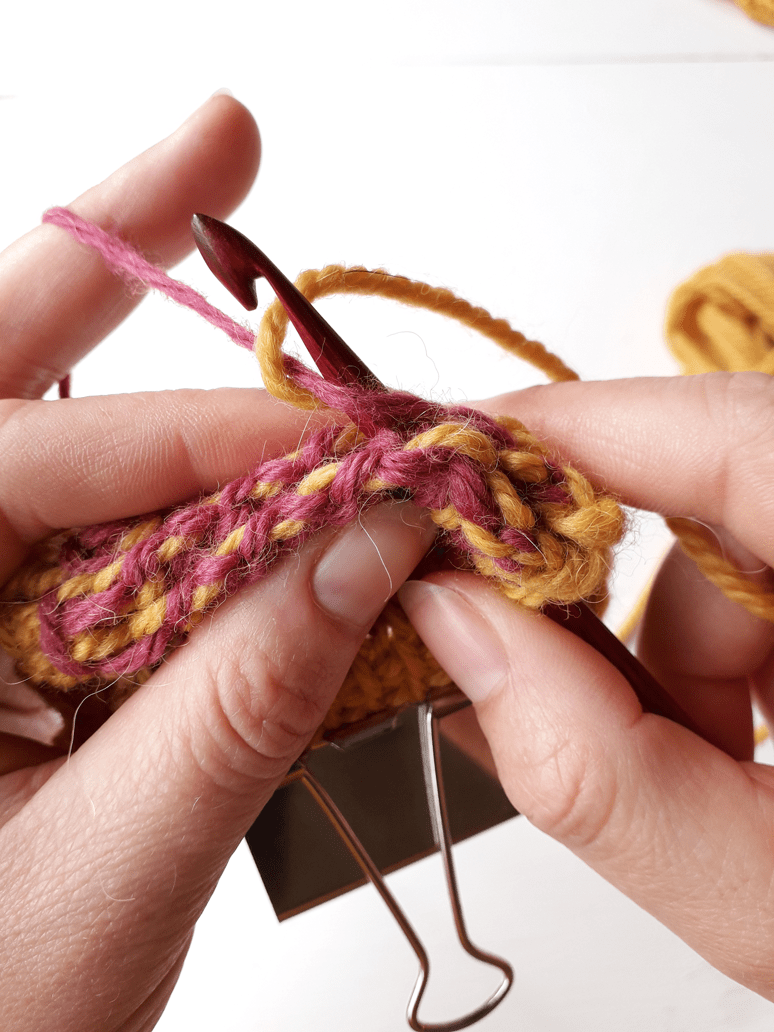
Once you’ve worked across the colour block, continue by working a TKS with CC, a TKS with MC and draw up a final loop in chain with MC. Your hook will look like this:
Exercise 2 – Catching Main Colour Floats on the Return Pass.
To begin, work the following: With MC, YO and draw yarn through 1 loop, YO and draw loop through 2 loops. With CC, YO and draw yarn through 2 loops. With MC, YO and draw yarn through 2 loops.
That’ll get us here:
Now, luckily, the Return Pass floats are caught with the exact same motions as the Forward Pass floats. Let’s go through it visually:
Yarn over with CC
With CC still on hook, Yarn Over with MC
return CC to back of fabric, and then draw CC through 2 loops
The next stitch is worked as normal:
Yarn Over hook
Draw Yarn Over through two loops
Again, as with the Forward Pass, you don’t need to do this every single stitch, but I recommend you at least do it every few stitches. I catch my return pass floats every second stitch when I’m working mittens.
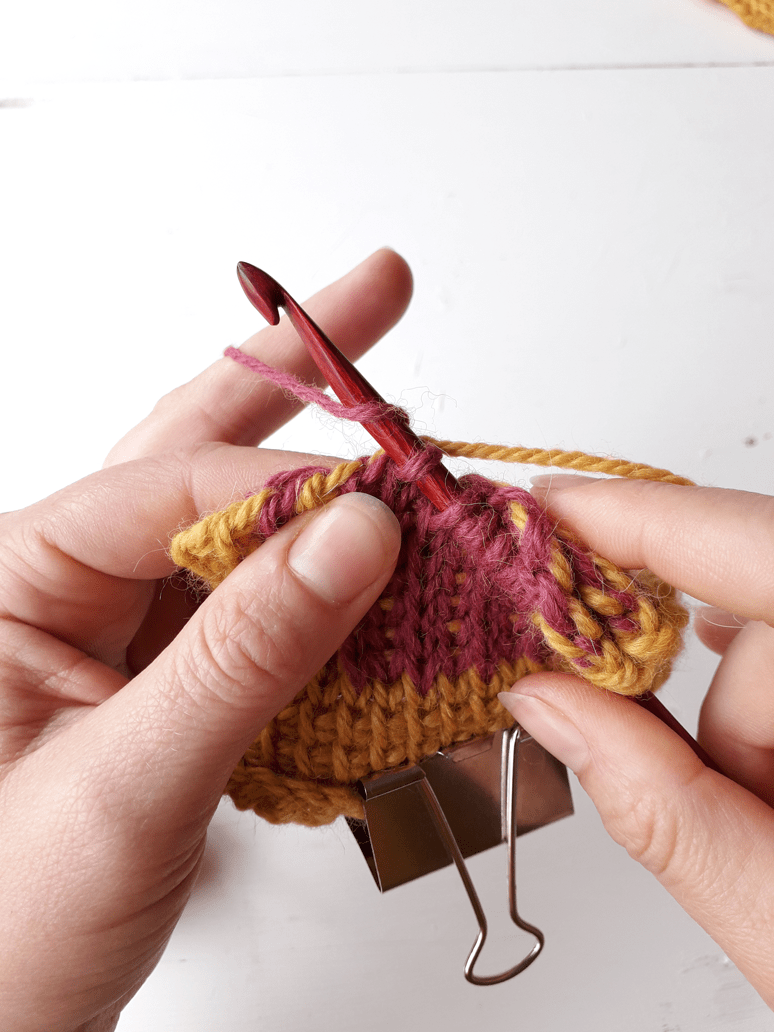
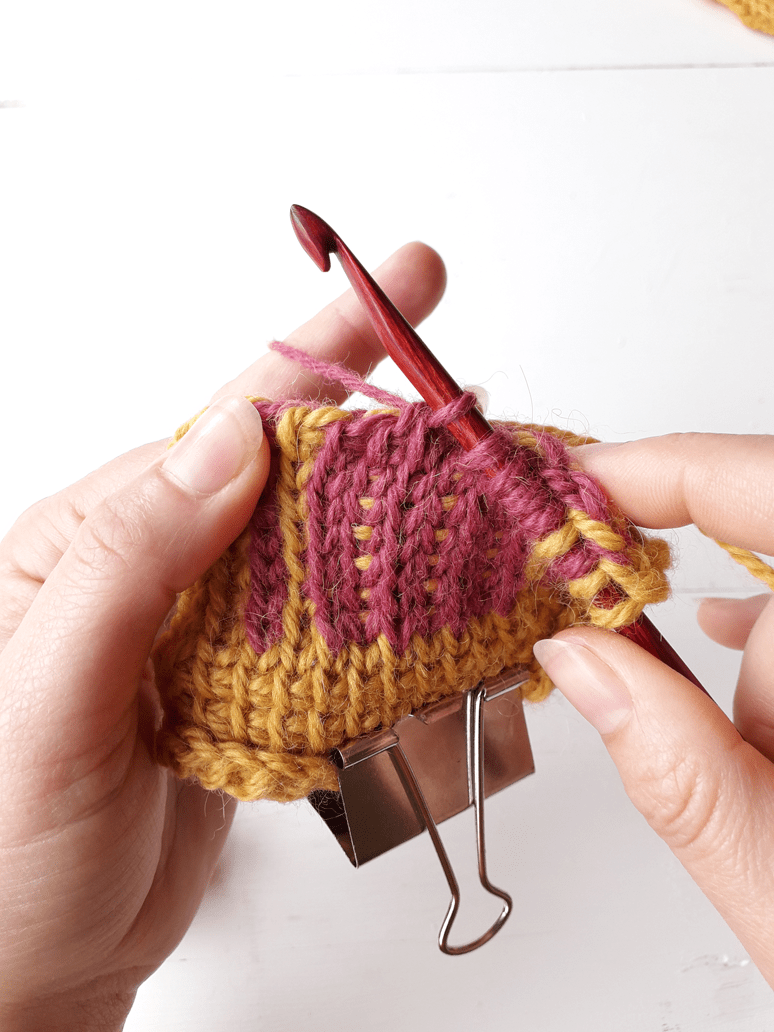
From this point on, the rule is as follows: Yarn Over with the colour that is displayed SECOND from the hook. In the case of the photo below, the next Yarn Over would be CC (Pink):
When complete, this is what the Right Side will look like:
As for the Wrong Side? Aaah, look at all those lovely caught floats!
Ogham is on sale right now. Get your PRE-ORDER DISCOUNT NOW!
Don’t be alarmed by the giant bull clip on the end of my fabric! It’s just there to counter this thick fabric’s tendency to curl.
The middle (Pink) block of colour is where we will be catching floats.
I started with 15 chains and worked a few rows of 13 TSS before I got stuck into the stranded colourwork TKS section
A. Insert hook TKS-wise into 1st st, Yarn Over with Main Colour (MC) and pull loop through onto hook – 2 loops on hook.
snuggle hook under bar
push out to back of fabric
yarn over with Main Colour & pull yarn through fabric
B. Insert hook TKS-wise into 2nd st, Yarn Over with Contrast Colour (CC) and pull loop through onto hook – 3 loops on hook.
snuggle hook under bar
push out to back of fabric
yarn over with Contrast Colour (CC) & pull yarn through fabric
C. Insert hook TKS-wise into 3rd st, Yarn Over with MC and pull loop through onto hook – 4 loops on hook.
snuggle hook under bar
push out to back of fabric
yarn over with MC & pull yarn through
D. Insert hook TKS-wise into 4th st, Yarn Over with CC and pull loop through onto hook – 5 loops on hook.
snuggle hook under bar
push out to back of fabric
yarn over with CC & pull yarn through
Here’s the lay of the land right now:
from right to left: Loop on hook at the beginning (Main Colour), TKS (MC), TKS (Contrast Colour), TKS (MC), TKS (CC)
Exercise 1 – Catching Main Colour Floats on the Forward Pass.
This is where it gets fun!
We will be crocheting with CC and “catching” the MC yarn as a “float”. The resulting stitch will be CC (pink) but the back of the st will have the strand of MC (yellow) running through it.
insert hook as for TKS (see above)
bring MC to front of fabric
Yarn Over with CC
return MC to back of fabric
add a little tension to MC and then draw CC through fabric
The next CC st along can be completed as usual.
insert hook TKS-wise into next stitch, and Yarn Over with CC
draw Yarn Over through fabric
There is no need to catch a float with every single stitch. Usually, I just catch every even-numbered stitch in a block of colour. You may choose to do it less frequently if you prefer, but if you are making mittens, I recommend you catch your floats pretty frequently so they don’t snag on wiggly fingers or chipped nails.
Once you’ve worked across the colour block your hook will look like this:
the little blips of yellow you can see through the pink stitches are the floats I have caught. They are really only visible here because I have used a slightly bigger hook than recommended for this yarn so you can see clearly what I’m doing. Those blips are far less visible when you’re working with the correct hook size for your tension.
Working the end of the row will leave us with this layout on our hook:
Exercise 2 – Catching Main Colour Floats on the Return Pass.
To begin, work the following: With MC, YO and draw yarn through 1 loop, YO and draw loop through 2 sts. With CC, YO and draw yarn through 2 loops. With MC, YO and draw yarn through 2 loops. With CC, YO and draw yarn through 2 loops .
That’ll get us here:
Now, luckily, the Return Pass floats are caught with the exact same motions as the Forward Pass floats. Let’s go through it visually:
bring MC to front of fabric
Yarn Over with CC
return MC to back of fabric, and then draw CC through 2 loops
The next stitch is worked as normal:
Yarn Over with CC
draw Yarn Over through 2 loops
Again, as with the Forward Pass, you don’t need to do this every single stitch, but I recommend you at least do it every few stitches. I catch my return pass floats every second stitch when I’m working mittens.
From this point on, the rule is as follows: Yarn Over with the colour that is displayed SECOND from the hook. In the case of the photo below, the next Yarn Over would be MC (Yellow):
When complete, this is what the Right Side will look like:
As for the Wrong Side? Aaah, look at all those lovely caught floats!
Ogham is on sale right now. Get your PRE-ORDER DISCOUNT NOW!
It’s not that I haven’t been working. Not as such. But I have been finding it almost impossible to work in the way I used to. My creative conveyor belt has a kink in it for the first time in decades and it’s proving to be a challenge to straighten out.
You see, we’ve had a few minor emotional blows lately, and with the background effects of the pandemic adding daily stressors already, these minor blows have felt more like mountains than molehills.
In the past I’ve spoken at length on the effect of detriorating mental health and an increase in stress and negative emotion on our creative flow. In a nutshell, the more stress we’re under, the more our monkey brain thinks we’re being stalked by a tiger, and the less importance the monkey puts on pausing to admire a beautiful sunset or a pretty flower.
If we’re worried, we don’t create so well. Pretty simple.
Oddly, though, for me the bottleneck right now isn’t so much in the ideas department – I have plans, folks, ooooh, I have plans. It’s the “the sitting down and working out the maths” department where I’m having the problem instead.
The nature of the emotional blows I’ve faced have been rooted in childhood traumas and I get the impression that that is making me feel less confident in my abilities than usual. I’m starting to obsess too much (as I did as a kid) about things being perfect and about the possibility of “getting in trouble” or angering people if a pattern is a little fiddly, or not as clever as I feel it should be.
Case in point: I’m working on a mitten pattern for Tunisian Crocheters that I am SURE will knock your socks off IF I can just figure out this thumb.
I’m stuck on the construction of this last puzzle piece and have been for over a month. As I’m essentially reinventing the wheel, I keep getting stuck in the Shit Writing Vortex*, and it sucks.
Man, does it suck. I hate this feeling.
I am so excited to show you what I’ve been at as I sit quietly in my bubble and create, but I’m also scared in a way I haven’t felt in decades. It’s right in my gut and I’m not sure how to get over it.
Do I keep working on the thumb until I have full confidence in it? Or do I say “Good Enough is good enough” and hope for the best?
Neither options feel good right now. I feel a bit bereft.
What would you do? How’s your head feeling these days?
*Oh sure, the sample LOOKS good, but you know it’ll be a nightmare for people to follow the pattern with such a dogpile of techniques and exceptions in such a small area.
Imagine a world, dear readers, where your favourite ball of yarn never ran out – a world where that downy alpaca, shimmering silk or soft merino slid continuously between your industrious fingers and into project after glorious project.
I’ll leave you with that image for a moment… It’s worth savouring the idea, isn’t it?
Alas, of course, this is merely a dream. The reality is that yarn runs out and it’s a rare project indeed that doesn’t require you to join the end of one ball of yarn to the beginning of another.
“I just knot it”, is a common refrain when I bring up this topic in a beginners’ class, and indeed, that is a valid way of solving the problem, but there are better ways, smoother ways, and since I can’t find much on this topic for Tunisian Crochet, I’m going to run you through my favourite joining method below.
The Return Pass Join: This little trick works well for both solid fabrics and lace. The idea here is that the joined yarns will be partially woven in as you work, and therefore won’t disrupt the look of the stitches you’ve made.
And since the join only disrupts the return pass on a row of Tunisian, any lace detail worked on the forward pass will remain totally uninterrupted.
In the sample below, I’m working on a solid TSS fabric (because this is what I have to hand. More in this project in autumn).
^ When you are nearing the end of your current ball, work the forward pass of the next row as usual, and begin the return pass.
^ A few sts into the return pass, pause, and introduce your new ball strand. Lie them so there are a few inches extra on either side of the overlap.
^ Hold strands together using your working hand. Use your other hand to hold new strand against fabric so that it’s out of the way.
^ With both strands held together in your working hand, Yarn Over. Remember, your other hand is still holding the new end against the back of your fabric so that it won’t be a nuisance.
^ Draw that double-stranded Yarn Over through 2 loops. You will notice that the loop closest to the hook is now double-stranded. This is good. This means your new and your old balls are sharing duty and you’re half-way transferred from one ball to the other.
^ It’s time now to drop the new ball’s strand that you’ve been holding in your other hand. It’s secure enough in the fabric now that it won’t slide out on you as you work. In this image, I’ve the end of the new strand in my left hand, and I’m about to drop it.
From this point on, you can carry on with your new ball and complete the return pass as usual.
^ Can you see the join? It’s right there in the middle. Slide your finger back and forth to see. Neat, huh?
^ Here’s a picture of the back when you’re all doing joining and have a few extra rows worked beyond.
Now, all you have holding those ends together is half a stitch, remember, and that’s a lot of trust to place in so tiny a piece of crochet, so I recommend you weave both ends in separately before you go to town with a scissors.
And so, dear crafters, I leave you with a puzzle. In the image below, there is a join.