Posted on Leave a comment

Creating Reoite’s “Snow Flower” – Part 2

This tutorial will guide you through the Return Pass for the Snow Flower stitch in my Reoite Glove pattern.

Recap

Here’s where we left off in Part 1.

The Forward Pass has been completed and we are ready to work the Return Pass

Have you picked up your copy yet?
Click Here!

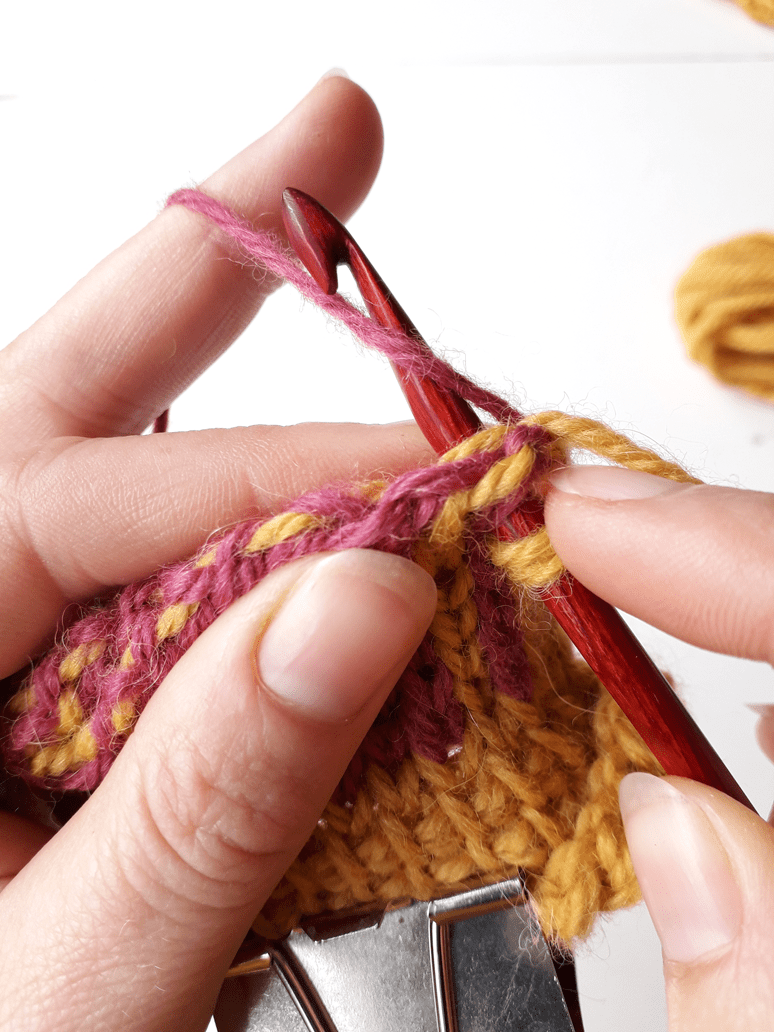
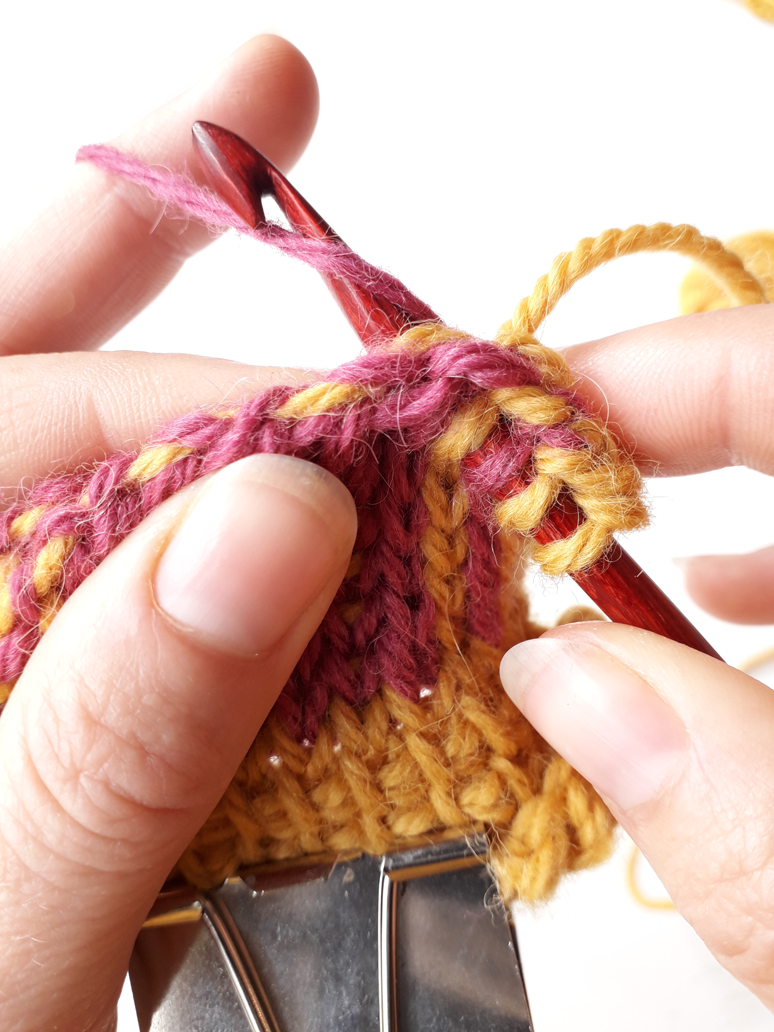
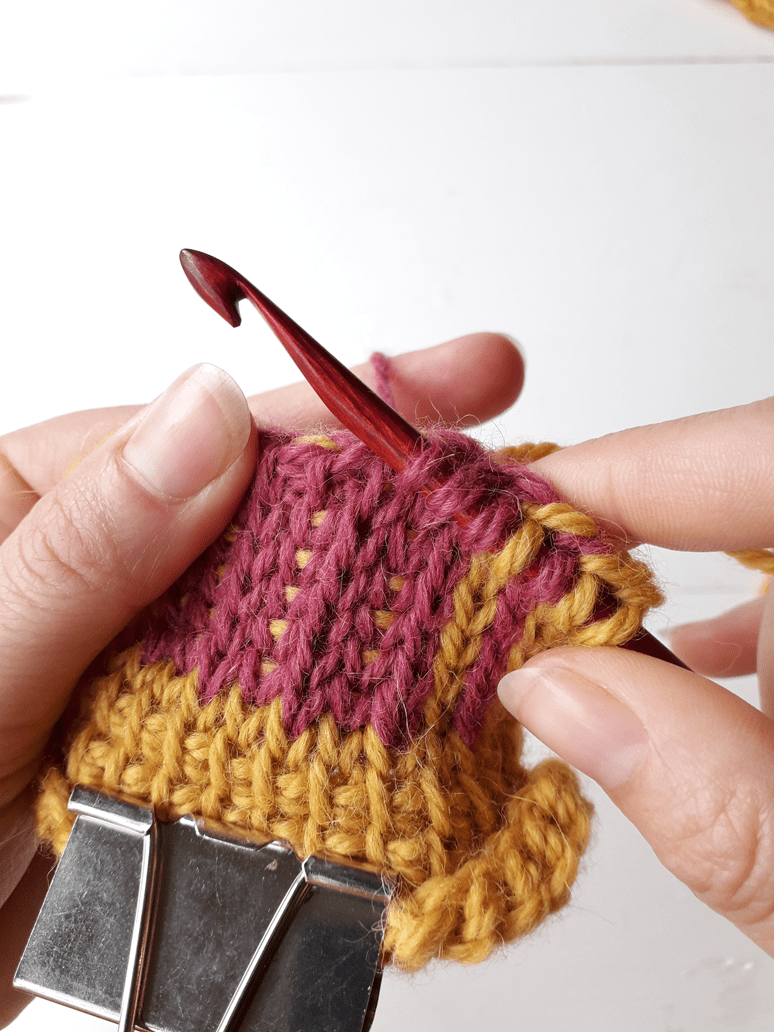
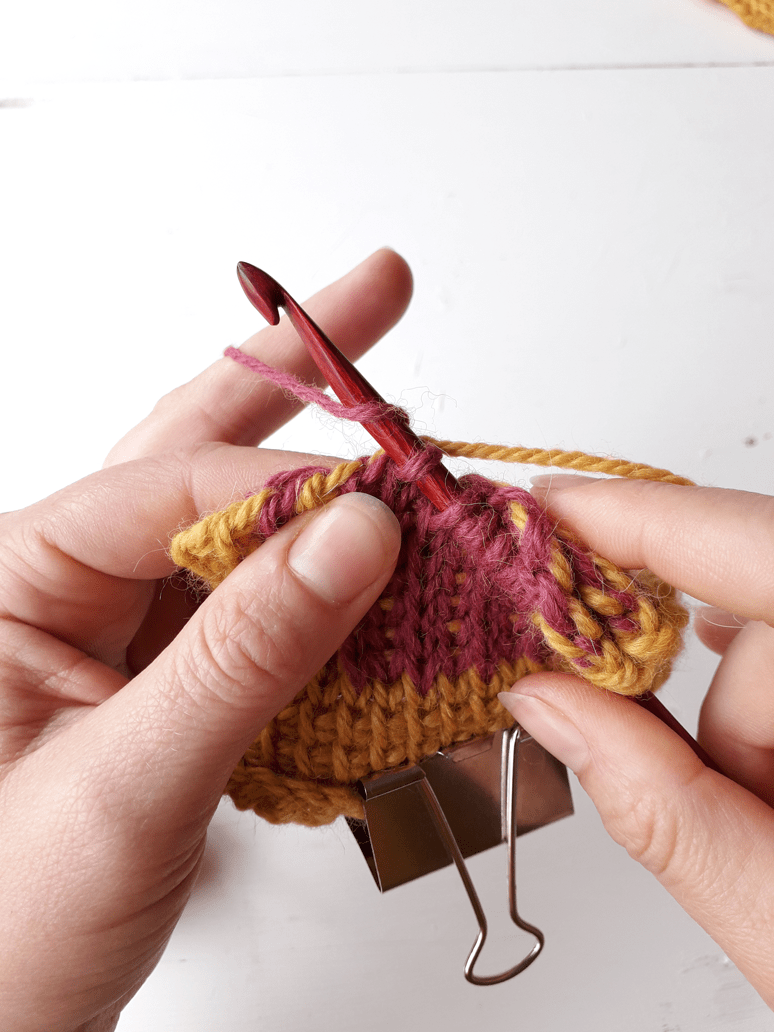
Work the Return Pass as usual until there are only two loops left before we reach the stitch marker:

(This will require referencing your copy of Reoite as the number of stitches to be worked will change depending on the glove size and Snow Flower position)

Two loops left on hook before the stitch marker is reached.

Remove the marker.

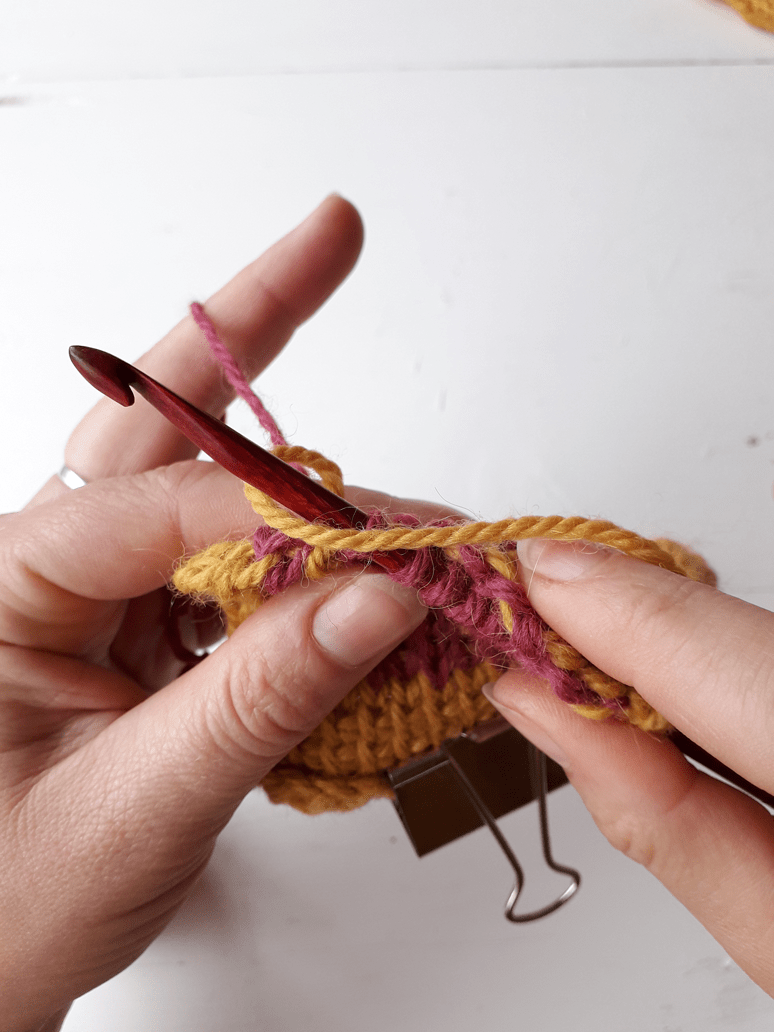
Then, Yarn Over and draw through 3 loops on hook.
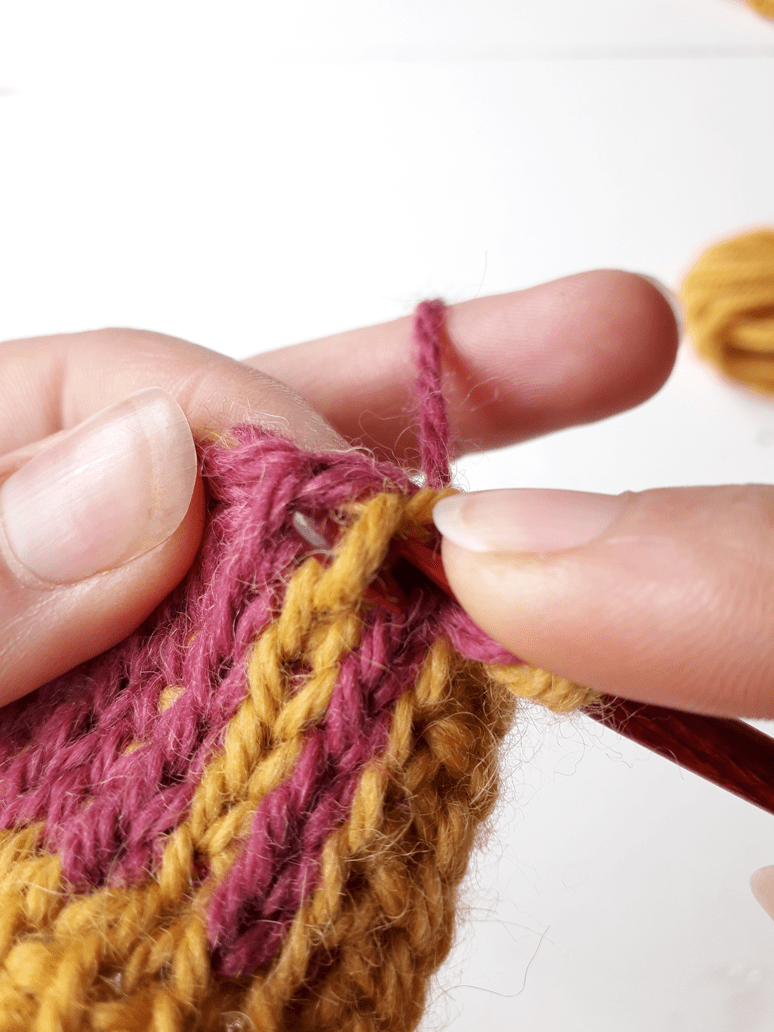
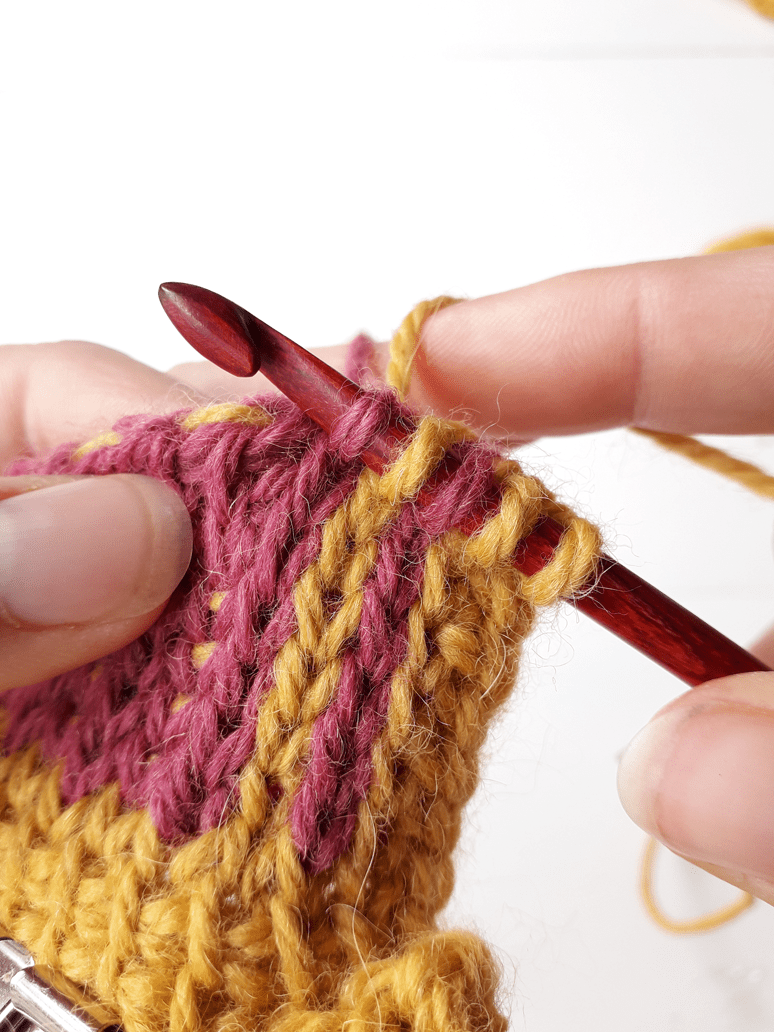
You will work through 2 tight loops and a loose (petal) loop.

Yarn Over in place on hook.
Yarn Over has been drawn through two loops
and the looser (petal) loop.
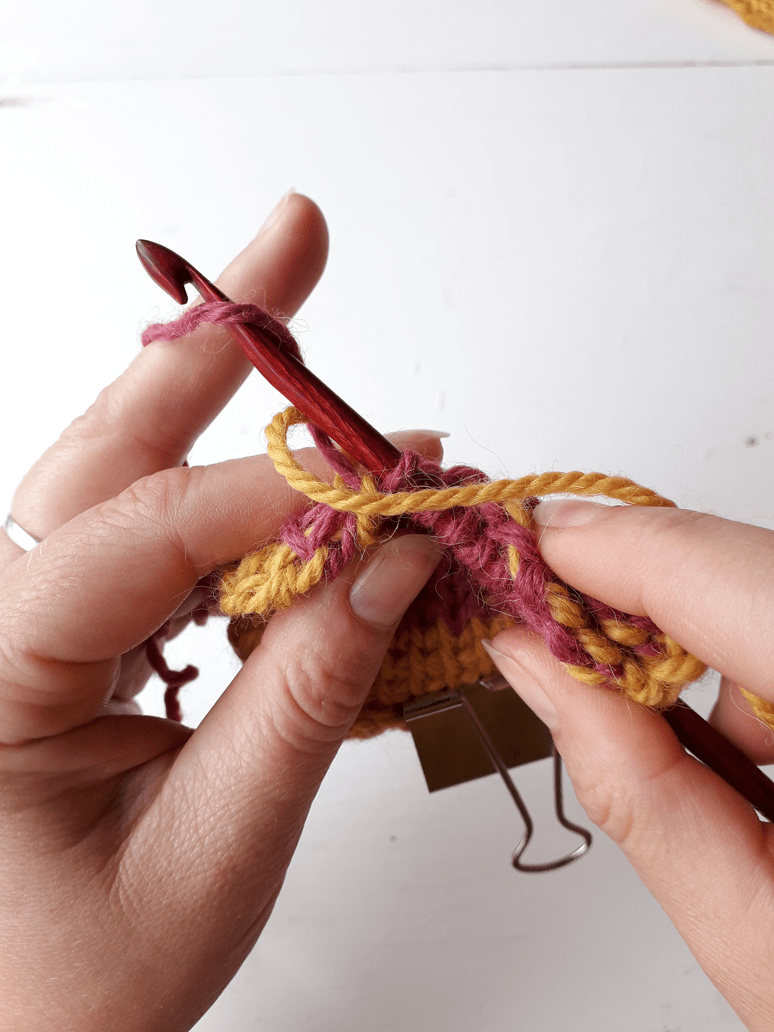
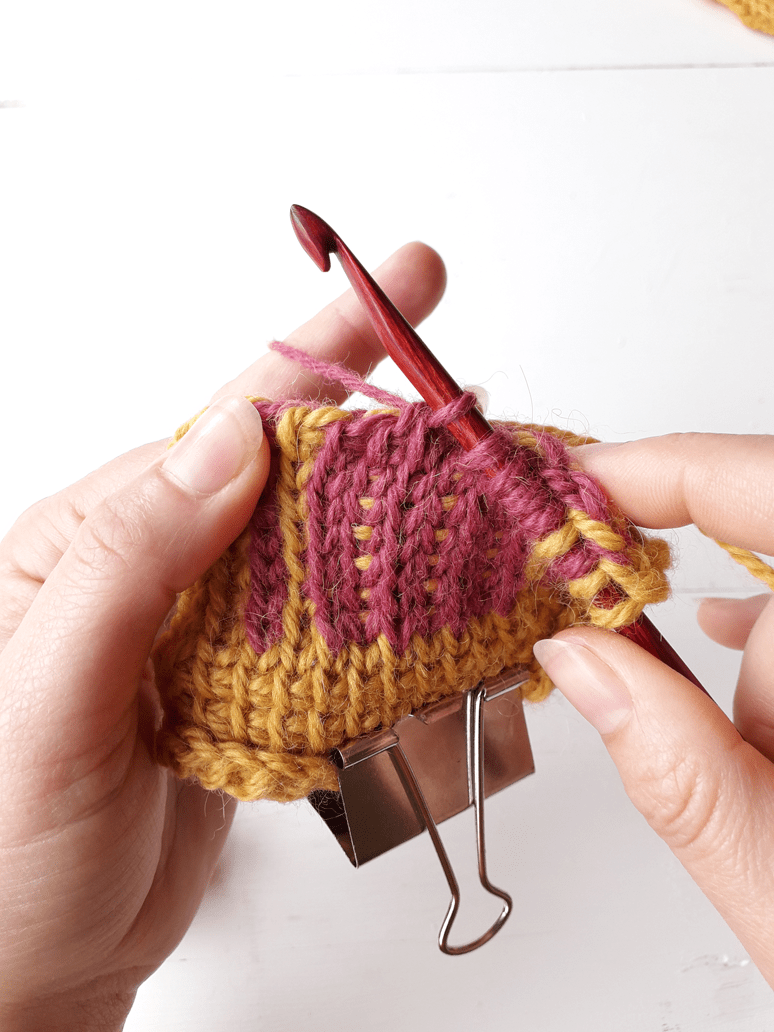
Note how the first petal has been worked off the hook.

Processing…
Success! You're on the list.

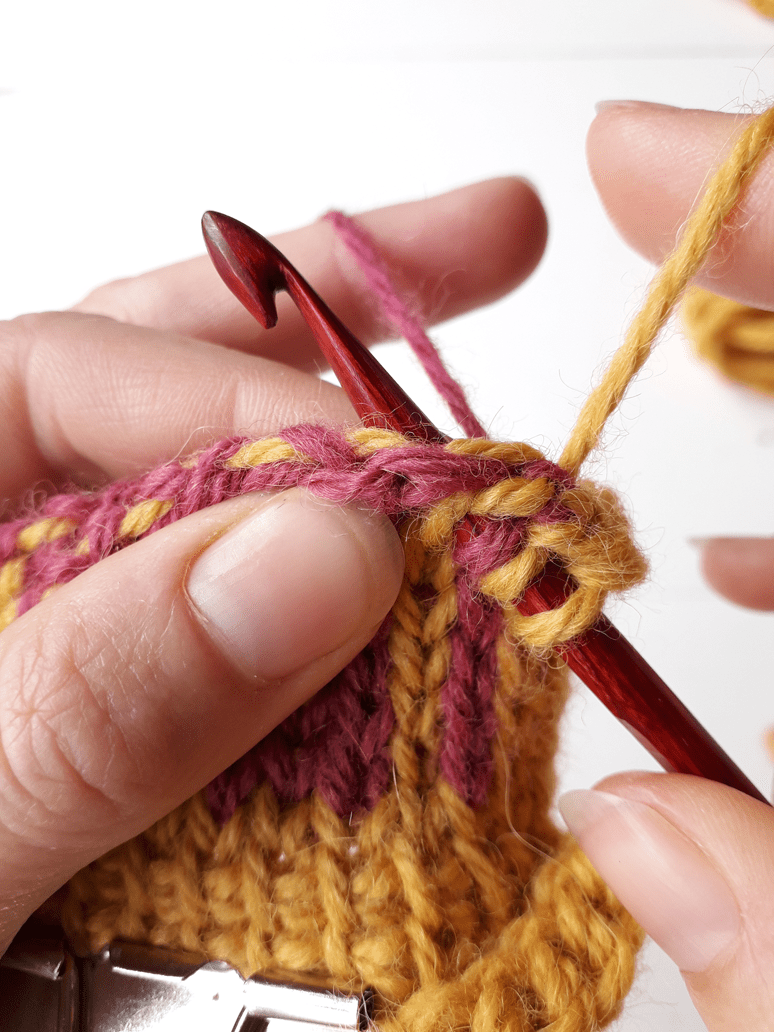
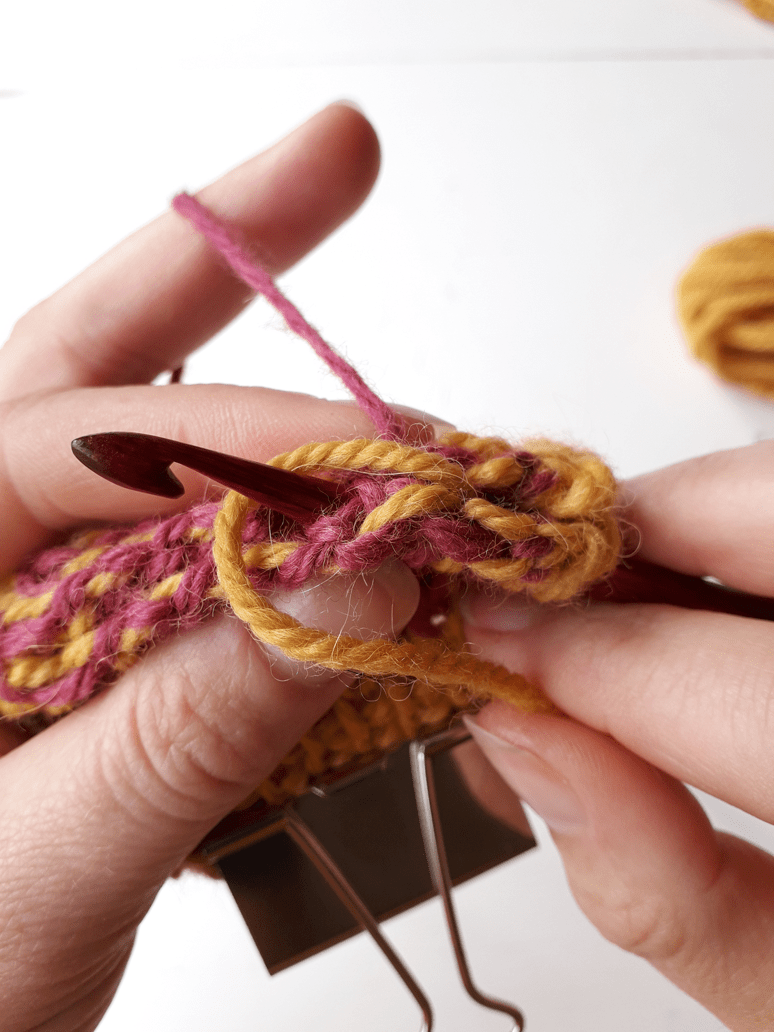
Make another Yarn Over and draw that through the next two loops and one looser (petal) loop.
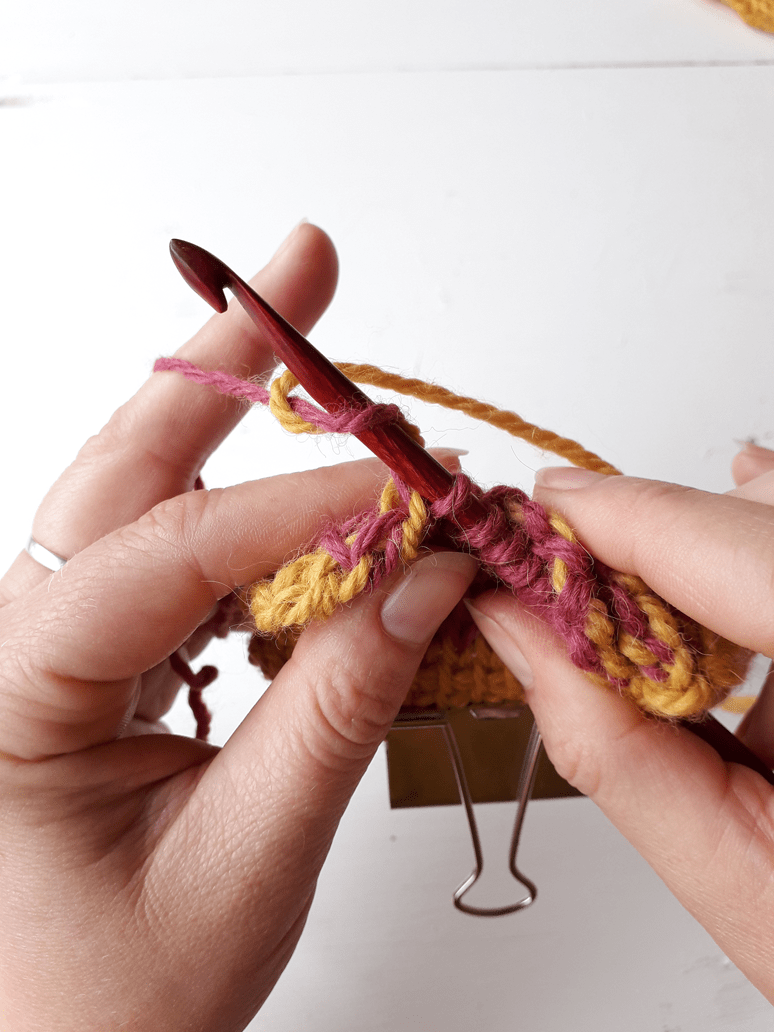
Do this repeatedly until all the petals have been removed from hook.

Second Repeat – second petal is off hook
Third Repeat – third petal is off hook
Fourth Repeat – fourth petal is off hook
Fifth Repeat – fifth petal is off hook
Sixth Repeat – sixth petal is off hook

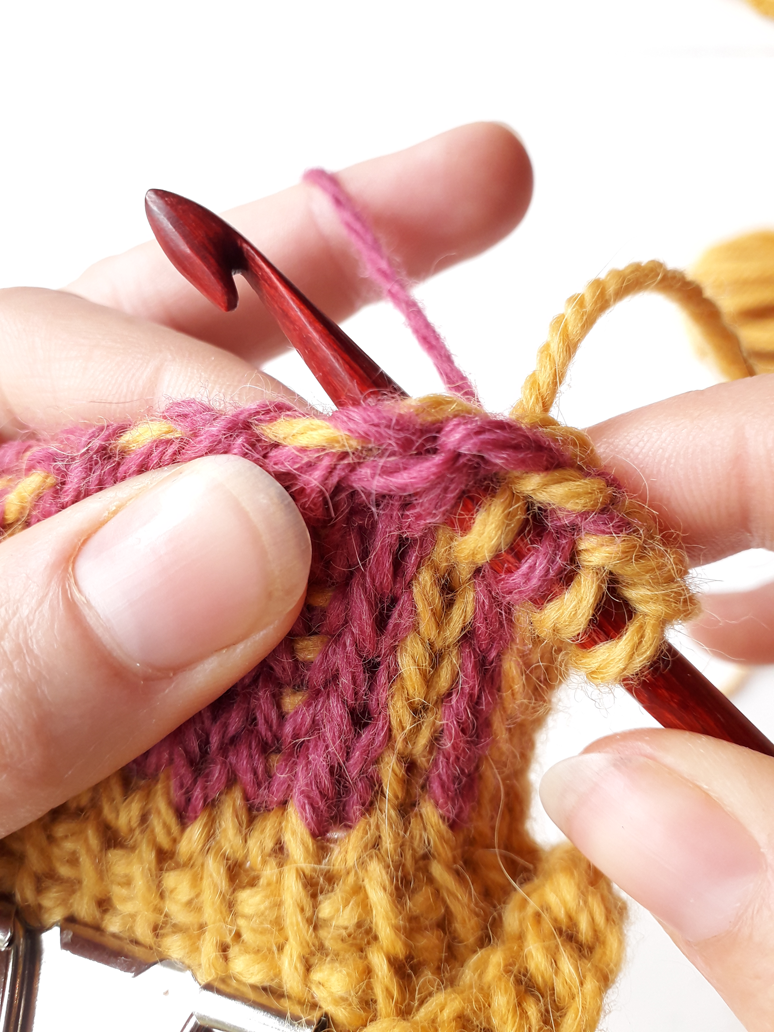
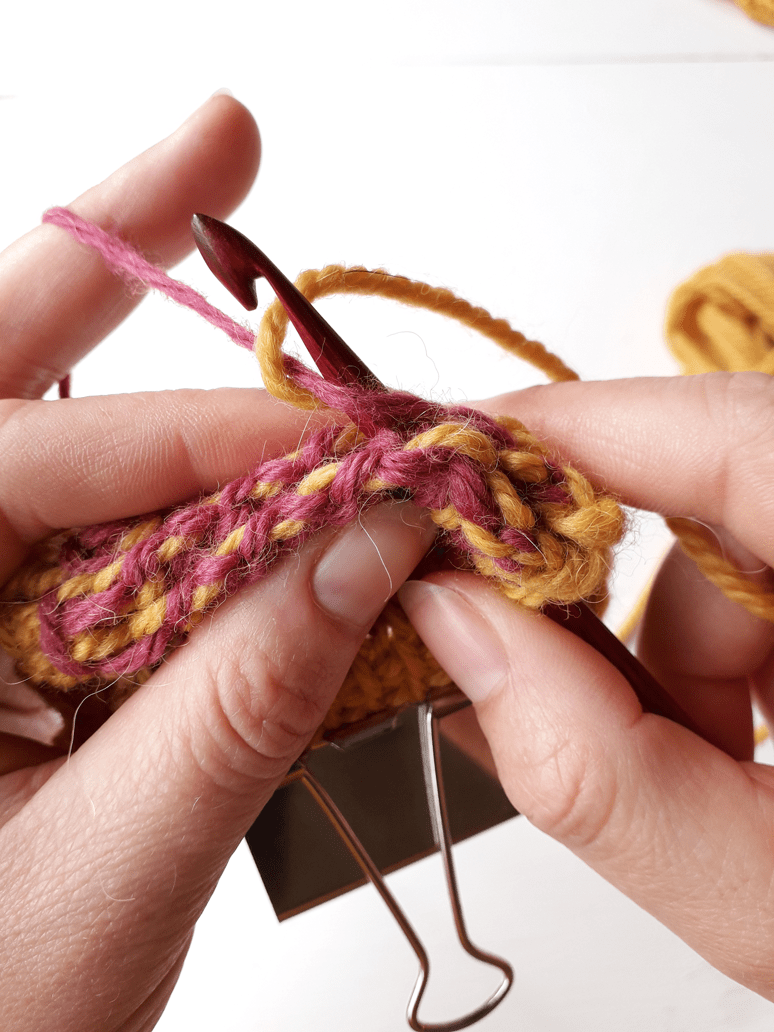
At this point all six petals of the Snow Flower have been worked off the hook, so now, we can complete the Return Pass in the traditional manner i.e.
*Yarn Over, and draw through 2 loops* repeatedly to end of row.

Nicely done!

My Patreon Supporters. Thank You!


Join My Patreon Family Here!

Marie Saur, Kathleen Robins, Jolin Lang, Sylvea Allington, Sherry Lynn Cekala, Marion Muir, Gwen Coltrin, Sarah Mcfall, Subethjimbob, Gillian Balharry, Michelle Ganoff, Liz Lowe, Heather Lane, Lisa Walsh, Cecilia M Mencias, Isabeau Suro, Ellen Krawiec, Caragh Barry, Wonne, Woolly Wormhead, Konni Wuppertalerin, Deanna Nielson, Mary A Maddy, Sue Horsburgh, Samantha Locke, Teresa Baker, Thea Hutchings, Mariag, Rachel Moutrie, Kris Park, Susan Baughman, Jill Shanmugasundaram, Sarah Davis, Patricia M Fragaszy, Lisa Hendrick, Fran Oberne, Amanda Blohm, Kate Hulme, Emily Owen, Ann Ryan, Kim Tijerina, Ursula Moertl, Kristin, Seyren, Tanja Osswald, Ursula Mayr, Judy Baldwin, Concetta Phillipps, Liss Allen, Maire, Beate Siefer, Kristen, Edi, Julie Marz, Sammy Campbell, Flootzavut, Kathlyn Smith, Regina Schweinsberg, Lora O’Brien, Anne Johannessen, Cheidner, Jasminetea182, Medora Van Denburgh, Heather Longino, Mary, Annie Wells


Posted on Leave a comment

Creating Reoite’s “Snow Flower” – Part 1

The “Snow Flower” on my Reoite Mitten pattern is worked as you crochet, rather than being added afterwards.
As such, it’s literally part of the fabric of the glove, making them warmer on your hand and cozier to the touch.

Reoite has 4 Snow Flowers per glove, and here’s how you create this gorgeous, textured effect with some simple loops and regular length crochet hook.

First Things First

There’s some crocheting to be done.

Getting set up to create the first Snow Flower

Have you picked up your copy yet?
Click Here!

Next, we have to locate a spot on the fabric we’ve created..

Three TSS sts in…
…and four rows down.

From the next stitch along, count three stitches in, and then count four rows down. There is a little hole in your fabric on the bottom right of that stitch’s bar.
(It’s on the bottom left for left-handed makers)

The First Petal


Insert your hook into that hole, push through to the back of your fabric and make a Yarn Over.

Hook about the enter fabric
Hook at back of fabric, with Yarn Over added

Draw Yarn Over through to the front of work, and stretch until loop reaches top of fabric.

This is your first Snow Flower petal

Peek behind the petal you have just made and you’ll see the previous row’s TSS bars sitting there.
Insert hook into the next one along:

Hook in next TSS ba along

Yarn Over, and draw through:

Yarn Over
Draw Yarn Over through bar

Processing…
Success! You're on the list.

Adding More Petals

We will repeat the above dance steps a few times until our flower starts to bloom.

Insert hook into same hole in fabric, Yarn over and draw a second petal loop through to front
Locate next TSS bar on previous row behind petal, insert hook, Yarn Over and draw another loop onto hook

Once you’ve done this repeatedly, you’ll notice that the loops on your hook alternate between a long (petal) loop and a shorter (TSS) loop.

Stop picking up loops when you have 6 petals and 5 TSS loops on your hook.

Pop a latchable stitch marker onto your hook.

Make sure the stitch marker you use is a removable one.

Complete the row as directed in the pattern:
(This varies depending on the position of the Snow Flower, so follow the pattern to be sure).

Forward Pass is complete

For a Photo Tutorial of the Return Pass, click here.

My Patreon Supporters. Thank You!


Join My Patreon Family Here!

Marie Saur, Kathleen Robins, Jolin Lang, Sylvea Allington, Sherry Lynn Cekala, Marion Muir, Gwen Coltrin, Sarah Mcfall, Subethjimbob, Gillian Balharry, Michelle Ganoff, Liz Lowe, Heather Lane, Lisa Walsh, Cecilia M Mencias, Isabeau Suro, Ellen Krawiec, Caragh Barry, Wonne, Woolly Wormhead, Konni Wuppertalerin, Deanna Nielson, Mary A Maddy, Sue Horsburgh, Samantha Locke, Teresa Baker, Thea Hutchings, Mariag, Rachel Moutrie, Kris Park, Susan Baughman, Jill Shanmugasundaram, Sarah Davis, Patricia M Fragaszy, Lisa Hendrick, Fran Oberne, Amanda Blohm, Kate Hulme, Emily Owen, Ann Ryan, Kim Tijerina, Ursula Moertl, Kristin, Seyren, Tanja Osswald, Ursula Mayr, Judy Baldwin, Concetta Phillipps, Liss Allen, Maire, Beate Siefer, Kristen, Edi, Julie Marz, Sammy Campbell, Flootzavut, Kathlyn Smith, Regina Schweinsberg, Lora O’Brien, Anne Johannessen, Cheidner, Jasminetea182, Medora Van Denburgh, Heather Longino, Mary, Annie Wells


Posted on Leave a comment

TSS2tog decrease

It’s hard to imagine, but sometimes, Dear Reader LESS Tunisian Crochet is called for.
And in those moments, knowing how to decrease is a boon.

In my Reoite Gloves, we use decreases to add a little shape to the fabric. This ensures that we have a cuff that sits comfortably on the wider part of the arm, as well as a glove that sits snug at the wrist and knuckles with no room for pesky drafts to sneak in.

Here’s how the TSS2tog (Tunisian Simple Stitch 2 together) is made.


Work the pattern up to the point where you need to make a TSS2tog:

Part of the Forward Pass on this row of Tunisian Simple Stitch is complete.

Have you picked up your copy yet?
Click Here!

Slide your hook through the next TWO bars along:

Two bars on hook

Yarn Over hook:

Yarn Over

Processing…
Success! You're on the list.

Draw Yarn Over through the two bars on hook:

You have created a TSS2tog stitch by making one loop (on hook) out of two bars (on previous row).

When you complete the rest of the row, you can see a little upsidedown V shape indicating the point you worked the TSS2tog decrease.

The decrease will appear one row LOWER than you may expect. Remember that if you use them to count rows.

Note:
The Return Pass is worked as normal i.e.
Yarn Over, draw through 1 loop to make a chain stitch, then *Yarn Over, draw through 2 loops* repeatedly to end of row.

My Patreon Supporters. Thank You!


Join My Patreon Family Here!

Marie Saur, Kathleen Robins, Jolin Lang, Sylvea Allington, Sherry Lynn Cekala, Marion Muir, Gwen Coltrin, Sarah Mcfall, Subethjimbob, Gillian Balharry, Michelle Ganoff, Liz Lowe, Heather Lane, Lisa Walsh, Cecilia M Mencias, Isabeau Suro, Ellen Krawiec, Caragh Barry, Wonne, Woolly Wormhead, Konni Wuppertalerin, Deanna Nielson, Mary A Maddy, Sue Horsburgh, Samantha Locke, Teresa Baker, Thea Hutchings, Mariag, Rachel Moutrie, Kris Park, Susan Baughman, Jill Shanmugasundaram, Sarah Davis, Patricia M Fragaszy, Lisa Hendrick, Fran Oberne, Amanda Blohm, Kate Hulme, Emily Owen, Ann Ryan, Kim Tijerina, Ursula Moertl, Kristin, Seyren, Tanja Osswald, Ursula Mayr, Judy Baldwin, Concetta Phillipps, Liss Allen, Maire, Beate Siefer, Kristen, Edi, Julie Marz, Sammy Campbell, Flootzavut, Kathlyn Smith, Regina Schweinsberg, Lora O’Brien, Anne Johannessen, Cheidner, Jasminetea182, Medora Van Denburgh, Heather Longino, Mary, Annie Wells


Posted on Leave a comment

Sewing up your colourwork mittens


You have all your three mitten bits made, and it’s time to sew them all together.

Here’s how I did it:

First Things First

Weave in your ends and block your pieces.
Tunisian Crochet fabric has a tendency to curl, you may have noticed.
Tunisian Knit stitch is renowned for this feature. And as we’re working a pretty dense fabric for our mittens, that curl can be quite enthusiastic.

So blocking before you sew will ensure your panels behave (and look) far better.

All blocked and ready to rock!


With Wrong Sides facing in on Panels 1 & 2, seam up thumb side of wrist from Row 1 – Row 24 with Main Colour

Starting at the cuff, use a top / whip stitch to seam up edge of cuff.
Stop sewing when you complete the horizontal stripes.
I like to add a few extra stitches to the last stripe to reinforce the edge.
First seam complete. Gorgeous!

Adding The Thumb

Then, with wrong sides still facing in, align marked st on thumb with top of wrist seam.
Seam side of thumb with left Panel for 15 (17/19) sts.

Fold thumb in half lengthways and seam up edges to tip of thumb.

Use a whip / Top stitch for a flat thumb seam
weave a strand of yarn in and out around tip of thumb
pull firmly to close hole


Finishing Up

Beginning at top of wrist seam again, seam other side of thumb with other Panel for 15 (17/19) sts.

Begin sewing where indicated above.
continue seaming around edge of glove, and down other side of cuff.

Weave all your ends in, and you’re done!

One of the beautiful things about this method of construction is that it is infinitely adaptable.

If you find your hand fits better in a Large glove, but you thumb finds a Large thumb too roomy, you can down size to suit you. Similarly, if your thumb is larger than the mitten size that fits, you can shift that around too.

There is no need to rip back all your work to the base of the thumb and re-do it all. You just need to whip yourself up a new thumb and lash that on in.
Super!


Posted on Leave a comment

A reverse TSS2tog for a neater mitten


Tunisian Crochet has a symmetry problem, insofar as it has none.

You may have noticed that each row’s stitches are drawn from the last row’s stitches by pulling them out of the fabric on the side of your dominant hand. This barely matters when we’re working a large piece, or when a slight shift to the right or left can’t be noticed, but for colourwork, especially colourwork that contains decreases, it becomes pretty clear pretty fast.

My mitten designs include TSS2tog decreases towards the finger tips that help reduce the number of stitches, drawing the mitten tip to a pretty point. But, as they are colourwork mittens, the decreases pose a problem;
while the decrease on the right of my fabric (my dominant side) looks lovely and neat, the one on the left gets all bitty and jagged.

Booooooo.

Compare the photos below to see what I mean:

The pink line on the left is made with regular TSS2tog sts and is jagged and broken as a result
The pink line on the left is made with a reversed TSS2tog and is neat and solid as a result


What we’re going to do in this tutorial is work the first TSS2tog as normal. No point in fiddling with perfection, right?

Then we’re going to use a blunt-ended darning needle (a bodkin) to simulate a TSS2tog in the opposite direction.
Hold on to your hats, people. Things are about to get weird!

The First TSS2tog

Firstly, we’re going to work 1 TKS in yellow which is our Main Colour (MC), and then the first TSS2tog on the row in pink, our Contrast Colour (CC).

Make 1 TKS with Main Colour (MC)
Push hook TSS-wise through the next 2 sts, then YO with CC
Draw CC through both sts.
(1 TSS2tog made)

After that, we’re going to work TKS sts across to within 3 sts of the end.
Don’t forget to catch your floats!


Reverse TSS2tog

Here’s where our trusty bodkin comes into play.

Draw both strands to the front of the hook
Thread CC onto a bodkin
sew bodkin through next two sts in same direction as hook is pointing
Pull CC through fabric.
Remove bodkin.
Return both strands to back of fabric
Place CC loop on hook.
Tighten CC loop.
Work final MC TKS st and draw up a final loop in chain

Work return pass as normal.

After a few rows of this malarkey, you’ll see the effect of your reverse TSS2tog stitches.
So smooth!


Posted on Leave a comment

Make your Ogham Mitten UNIQUE!

Ogham (either pronounced OW-am or OG-am, depending on who you ask), is a native Irish writing system that is all of 2,000 years old.

It’s impossible now at such a remove to know exactly what it was most used for, but many of our surviving examples are carved into standing stones. A large number of those stones mark ancient boundaries between kingdoms, so the thought is that they were basically signs used to lay claim to certain tracts of land in the really early Medieval / Pre-Christian period in Ireland.

Ogham is a script made entirely of lines cut across a central spine, and is similar in many ways to Nordic Runes.

The Ogham script featured on my pattern sample is my name!
A O I B H E is spelt out from cuff to finger tip, but I’m happy to say YOU get to choose what you’d like to put on your gloves to make them personal to you. Below, you will find a full alphabet (in Ogham order, rather than Aplbhabetical) and in the pattern you’ll find a blank chart so you can make your mittens absolutely unique.

All I ask is that you spell your words from bottom to top, like the ancient Irish did. 😉

Getting Charting

On your mitten you have a maximum of 37 lines.
As some letters use up more space than others, I have added a line count to the side of each letter’s chart, so you can plot accordingly.

Some letters you may expect to see don’t exist in Ogham.
Y, for instance, and V – but those can be represented well with close alternatives. In those cases, I have labelled the alphabet above with both variations, so you can make the best guess.


All you have to do now is decide with you wanna write, then print out the blank chart in your pattern, and add your letters in pencil.


Got a long name, or lots to say?


Luckily, Ogham can be used both letter-for-letter, or phonetically.
So, a name like Jennifer can be condensed down to “Gnfr”, and still be totally Ogham-legit.


Posted on 2 Comments

Duplicate Stitch / Swiss Darning


So, there you are, humming along, row after glorious row of Tunisian Crochet colourwork tumbling off your hook, and you pause for a moment to admire your progress.
And that’s when you notice it.

“Oh god. I have a stitch out of place”.

Worse still, it didn’t just happen. It was the result of a momentary lapse in concentration two days ago! ack!

And you’re left with an unenviable question; “Do I frog, or do I live with it?”
Neither option is very satisfying is it?

But luckily, my Mam taught me a third option when I was barely old enough to hold a pair of knitting needles. She called it “Swiss Darning”, which I think sounds elegant and fancy. I’ve heard it more commonly called “Duplicate stitch” these days, which has the virtue of being clear and descriptive.
Whatever you chose to call it, trust me, you’ll be singing its praises.

Here’s how it works:


Examine your fabric and identify the problem
There should be white horizontal stitches to the left, and the white lines to the right should be one stitch shorter.

Thread a blunt needle (a bodkin) with a strand of the yarn you’re using.
Pro Tip: If you can’t find a blunt needle, use a regular sharp darning needle and sew backwards with it. Be careful not to jab yourself, though!

In this case, I’m using Drops Flora in Denim Blue.

Getting Started

Secure your yarn at the back of your work. This will save you from accidentally sewing through your tail and making a mess of the wrong side of your fabric.

Bring bodkin to front of work at base of the stitch you wish to hide. Pull yarn through to front.
Push bodkin under next stitch up. Make sure bodkin passes cleanly thorugh BOTH strands of the stitch.
Draw yarn through stitch. Half of the white stitch is now hidden.
Clever, huh?
Push bodkin back though the base of the white stitch.
Pull yarn to back of work. Hey presto!


I repeated the process on the next two horizontal lines above, and then I got to fixing the missing white stitches on the left side of the work, too.

Bring bodkin to front of work at base of the stitch you wish to hide. Pull yarn through to front.
Push bodkin under next stitch up. Make sure bodkin passes cleanly thorugh BOTH strands of the stitch.
Draw yarn through stitch. Half of the blue stitch is now hidden.
Push bodkin back though the base of the blue stitch.
Pull yarn to back of work. And we have a white stitch where once there was a blue one!

Far better than all that frogging and cursing, am I right?

Oh, hey! And, this also works for knitting, too.
In fact, it was originally developed to add small colourowork detail to stocking stitch knitted fabric… so if you’re a knitter with basic skills, you’ve now learnt a fantastic way of sprucing up your knit stitches too!


Ogham is on sale right now.
Get your PRE-ORDER DISCOUNT NOW!

Posted on 4 Comments

Catching Floats in Tunisian Crochet Stranded Colourwork – Part 1


A note or two on this exercise:
1. Don’t be alarmed by the giant bull clip on the end of my fabric! It’s just there to counter this thick fabric’s tendency to curl.
2. The middle (Yellow) block of colour is where we will be catching floats.
3. I started with 15 chains and worked a few rows of 13 TSS before I got stuck into the stranded colourwork TKS section

In this example I have worked a few individual stitches before we get to the float-catching section of the exercise.
These are worked using alternating yarns like so:

A. Insert hook TKS-wise into 1st st, Yarn Over with Main Colour (MC) and pull loop through onto hook – 2 loops on hook.

snuggle hook under bar
push out to back of fabric
yarn over with Main Colour & pull yarn through fabric

B. Insert hook TKS-wise into 2nd st, Yarn Over with Contrast Colour (CC) and pull loop through onto hook – 3 loops on hook.

snuggle hook under bar
push out to back of fabric
yarn over with Contrast Colour (CC) & pull yarn through fabric

C. Insert hook TKS-wise into 3rd st, Yarn Over with MC and pull loop through onto hook – 4 loops on hook.

snuggle hook under bar
push out to back of fabric
Yarn Over with MC & pull yarn through fabric

Here’s the lay of the land right now:

Exercise 1 – Catching Contrast Colour Floats on the Forward Pass.

Are you ready?

We will be crocheting with MC and “catching” the CC yarn as a “float”.
The resulting stitch will be MC (yellow) but the back of the st will have the strand of CC (pink) running through it.

insert hook TKS-wise into next stitch
Yarn Over with CC
Yarn Over with MC
return CC to back of fabric
draw MC through fabric

The next MC st along can be completed as usual.

insert hook TKS-wise into next stitch
Yarn Over with MC
Draw Yarn Over through fabric

There is no need to catch a float with every single stitch.
Usually, I just catch every even-numbered stitch in a block of colour. You may choose to do it less frequently if you prefer, but if you are making mittens, I recommend you catch your floats pretty frequently so they don’t snag on wiggly fingers or chipped nails.

Once you’ve worked across the colour block, continue by working a TKS with CC, a TKS with MC and draw up a final loop in chain with MC.
Your hook will look like this:


Exercise 2 – Catching Main Colour Floats on the Return Pass.

To begin, work the following:
With MC, YO and draw yarn through 1 loop, YO and draw loop through 2 loops.
With CC, YO and draw yarn through 2 loops.
With MC, YO and draw yarn through 2 loops.

That’ll get us here:

Now, luckily, the Return Pass floats are caught with the exact same motions as the Forward Pass floats.
Let’s go through it visually:

Yarn over with CC
With CC still on hook,
Yarn Over with MC
return CC to back of fabric, and then draw CC through 2 loops

The next stitch is worked as normal:

Yarn Over hook
Draw Yarn Over through two loops

Again, as with the Forward Pass, you don’t need to do this every single stitch, but I recommend you at least do it every few stitches. I catch my return pass floats every second stitch when I’m working mittens.

From this point on, the rule is as follows: Yarn Over with the colour that is displayed SECOND from the hook.
In the case of the photo below, the next Yarn Over would be CC (Pink):

When complete, this is what the Right Side will look like:

As for the Wrong Side?
Aaah, look at all those lovely caught floats!


Ogham is on sale right now.
Get your PRE-ORDER DISCOUNT NOW!

Posted on Leave a comment

Catching Floats in Tunisian Crochet Stranded Colourwork – Part 2

A note or two on this exercise:

  1. Don’t be alarmed by the giant bull clip on the end of my fabric! It’s just there to counter this thick fabric’s tendency to curl.
  2. The middle (Pink) block of colour is where we will be catching floats.
  3. I started with 15 chains and worked a few rows of 13 TSS before I got stuck into the stranded colourwork TKS section

A. Insert hook TKS-wise into 1st st, Yarn Over with Main Colour (MC) and pull loop through onto hook – 2 loops on hook.

snuggle hook under bar
push out to back of fabric
yarn over with Main Colour & pull yarn through fabric

B. Insert hook TKS-wise into 2nd st, Yarn Over with Contrast Colour (CC) and pull loop through onto hook – 3 loops on hook.

snuggle hook under bar
push out to back of fabric
yarn over with Contrast Colour (CC) & pull yarn through fabric

C. Insert hook TKS-wise into 3rd st, Yarn Over with MC and pull loop through onto hook – 4 loops on hook.

snuggle hook under bar
push out to back of fabric
yarn over with MC & pull yarn through

D. Insert hook TKS-wise into 4th st, Yarn Over with CC and pull loop through onto hook – 5 loops on hook.

snuggle hook under bar
push out to back of fabric
yarn over with CC & pull yarn through

Here’s the lay of the land right now:

from right to left:
Loop on hook at the beginning (Main Colour), TKS (MC), TKS (Contrast Colour), TKS (MC), TKS (CC)

Exercise 1 – Catching Main Colour Floats on the Forward Pass.

This is where it gets fun!

We will be crocheting with CC and “catching” the MC yarn as a “float”.
The resulting stitch will be CC (pink) but the back of the st will have the strand of MC (yellow) running through it.

insert hook as for TKS (see above)
bring MC to front of fabric
Yarn Over with CC
return MC to back of fabric
add a little tension to MC and then draw CC through fabric

The next CC st along can be completed as usual.

insert hook TKS-wise into next stitch, and Yarn Over with CC
draw Yarn Over through fabric

There is no need to catch a float with every single stitch.
Usually, I just catch every even-numbered stitch in a block of colour. You may choose to do it less frequently if you prefer, but if you are making mittens, I recommend you catch your floats pretty frequently so they don’t snag on wiggly fingers or chipped nails.

Once you’ve worked across the colour block your hook will look like this:

the little blips of yellow you can see through the pink stitches are the floats I have caught. They are really only visible here because I have used a slightly bigger hook than recommended for this yarn so you can see clearly what I’m doing. Those blips are far less visible when you’re working with the correct hook size for your tension.

Working the end of the row will leave us with this layout on our hook:


Exercise 2 – Catching Main Colour Floats on the Return Pass.

To begin, work the following:
With MC, YO and draw yarn through 1 loop, YO and draw loop through 2 sts.
With CC, YO and draw yarn through 2 loops.
With MC, YO and draw yarn through 2 loops.
With CC, YO and draw yarn through 2 loops .

That’ll get us here:

Now, luckily, the Return Pass floats are caught with the exact same motions as the Forward Pass floats.
Let’s go through it visually:

bring MC to front of fabric
Yarn Over with CC
return MC to back of fabric, and then draw CC through 2 loops

The next stitch is worked as normal:

Yarn Over with CC
draw Yarn Over through 2 loops

Again, as with the Forward Pass, you don’t need to do this every single stitch, but I recommend you at least do it every few stitches. I catch my return pass floats every second stitch when I’m working mittens.

From this point on, the rule is as follows: Yarn Over with the colour that is displayed SECOND from the hook.
In the case of the photo below, the next Yarn Over would be MC (Yellow):

When complete, this is what the Right Side will look like:

As for the Wrong Side?
Aaah, look at all those lovely caught floats!


Ogham is on sale right now.
Get your PRE-ORDER DISCOUNT NOW!